How to Add Outlines to Your Photos

An essential part of graphic design is learning how to master layers. Layers make it easy to move design elements around and allow you to compare compositions by toggling their visibility. Most importantly, layers can be edited independently of each other. You can make certain layers stand out not just by moving them to the front of a composition, but by stylizing them with layer effects like glows, drop shadows, and more.
BeFunky’s Drop Shadow tool is a particularly easy way to make a subject stand out from a busy background. Whether you’re selling a product or looking to make your latest YouTube thumbnail stand out, a drop shadow can transform any layer in your design and make it pop. There are tons of ways to use this tool – add a neon glow to text, for example, or add depth to graphics. It can even be used for standout portraits and realistic design mockups. But one of the simplest, most effective ways to use the Drop Shadow tool is by using it to add an outline to an image layer.
Whether you want to add visual interest to a simple design or make the focal point stand out in a complex design, outlines have got you covered. In fact, this small trick can make a difference between someone clicking on your content or swiping right past it. In this article, we’ll show you how easy it is to use the Graphic Designer’s Drop Shadow tool to add an outline to any image. This can be done online without needing to download any bulky apps, or even from your phone!
Outlines vs. Borders
In the Photo Editor and Graphic Designer, outlines differ significantly from borders, which are another type of layer effect. Borders create rectangular strokes around an entire image, including transparent backgrounds. Outlines only surround the area around opaque pixels, making graphics and cutouts pop. Borders are great for photographs, posters, and other rectangular visuals, but outlines are what you should use when you want to make a non-rectangular layer element stand out!
How to Add an Outline to an Image Layer
To start, open up a design project in the Graphic Designer. You can start with a template to make things simple, or start from a blank canvas.
Step 1: Add an Image Layer to Your Design
Here we’re starting with a premade YouTube thumbnail template. (Outlines are particularly useful for YouTube thumbnails since they’re so small – it draws the eye and helps the subject stand out!) After deleting the placeholder image, upload the photo you want to use to the Image Manager and drag it onto the canvas.

Step 2: Cut Out Subject
Adding outlines to text and graphics can be done without this step, but when it comes to image layers, the Cutout tool and Outline effect go hand in hand. Click on the image and select Cutout/Remove BG in the Image Properties menu.

Now, automatically isolate the subject of the photo by clicking Remove Background. This AI tool will instantly detect and remove the background, trimming away any unnecessary transparent pixels in the process. Click Apply to finalize the changes and return to your design.

Step 3: Add an Outline to the Layer
Once you’ve applied the Cutout tool, select Shadow / Glow in the Image Properties menu and then select Outline in the dropdown menu that appears. This will instantly create a colorful outline around the image.

In the settings, adjust the outline color so that it matches the rest of your design. Optionally, use the Size or Density slider to adjust the outline thickness.

Step 4: Wrap Up and Save
Make final adjustments to your design and it’s ready to go! Export the file by clicking Save at the top of the canvas, followed by your desired format and location.

Image Outline Final Results
The background of this thumbnail template is attention-grabbing and colorful, which is perfect for a graphic design vlog. However, it’s also a bit busy and doesn’t offer a lot of negative space. Without an outline, the photo we wanted to use would get lost among the other design elements. With a white outline, the focal point of the design stands out much more!

3 More Ways to Use Outlines
An outline effect might be simple, but it can often take a design to the next level. Here are some inspiring outline examples that might help whenever you’re next stuck on a graphic design project.
1. Make Minimalist Designs Pop
Minimalist graphic design features lots of negative space, simple lines, and few colors. One struggle designers often have is how to adhere to minimalism while still making the piece look interesting and unique. One simple way to make a minimalist design pop is to add a colorful outline around the central visual, like we’ve done with this book cover below.

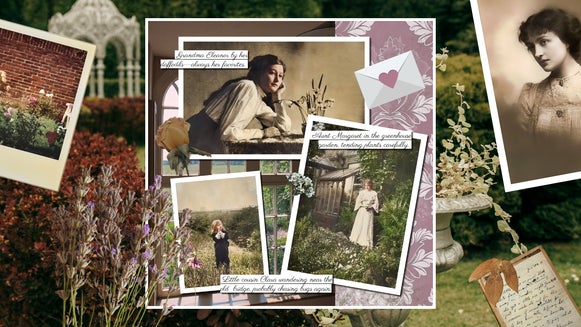
2. Create a Focal Point in Collages
On the flip side, without enough negative space, you might end up creating a design that’s too busy to look at. This can often happen in collage designs, which are great for things like birthday cards, scrapbooks, and social media posts. Adding an outline to the focal point creates a stronger visual hierarchy and makes the design easier to process.

3. Emphasize the Subject Layer
Create a unique effect in photographs by using the Detach Subject tool in place of the Cutout tool. This tool separates the subject from the background, creating a different layer for each. Add an outline to the subject layer to make it stand out from the rest of the photo. This is a great method for creating designs directly from a photo, such as ads and social media stories, which often need quick turnarounds.

Make Your Designs Stand Out With Outlines
If you ever feel like your design is missing something, an outline might be just what you need. As with other layer effects, it only requires a couple of clicks to create a drastic transformation, making it a versatile tool in your design arsenal. Step up your designs and add your first outline today in the Graphic Designer!