How to Design a Media Kit For Your Blog
Whether it’s day one or one hundred of your online journey as an influencer, there’s an important document you’ll need on hand: a media kit. Media kits are no longer just for large companies or high-selling products; they’re also the perfect opportunity for influencers to showcase the best of their brand and stand out from their competitors.
If you’ve never created a media kit before, you might be wondering “what is a media kit?” A media kit is a document – usually in PDF form – that outlines the key facts and statistics about your brand, whether you’re a micro-influencer, blogger, YouTuber, or more. It aims to show a potential advertiser why they should work with you, along with what value you can add to such a partnership.
If you’ve never created a media kit before or are looking to update yours, then you’re in luck. We’ll tell you what a media kit should include, as well as how you can create a media kit template for free using BeFunky’s Brochure Maker.
What Should a Media Kit Include?
A successful media kit can be broken down into 8 essential elements. We delve into each one in more detail below.
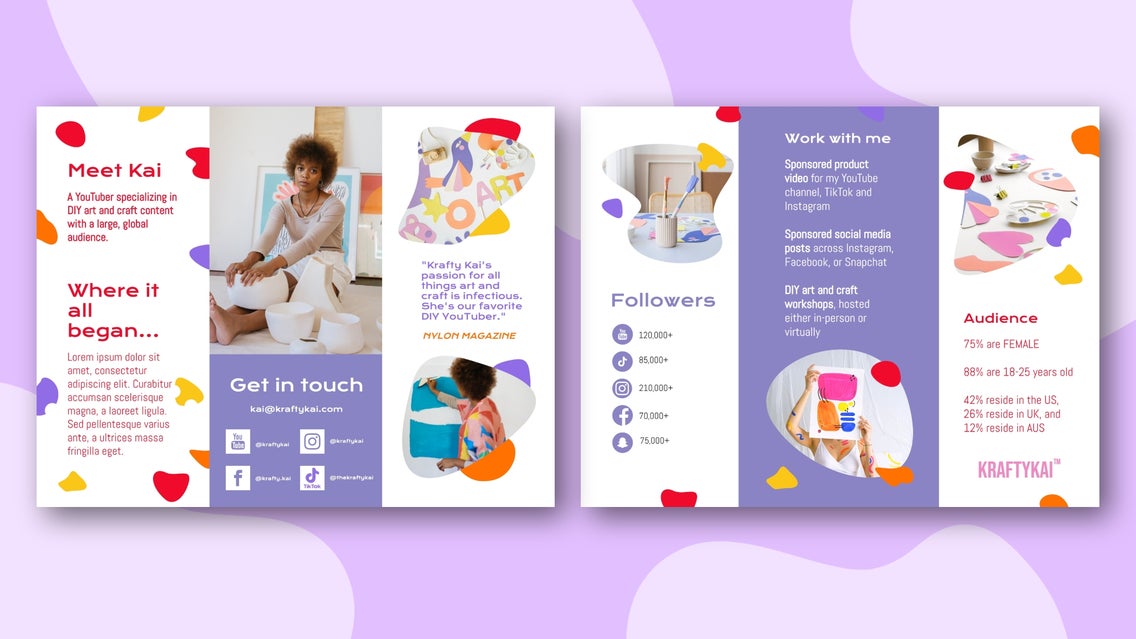
High-Quality Images
Let’s face it: no one wants to glance through a media kit if it resembles large chunks of unbroken text. The trick to making a media kit look inviting, as well as piquing your reader’s curiosity, is to include beautiful, high-quality images throughout. Firstly, you’ll want a flattering portrait to introduce yourself to potential collaborators. Make sure it’s well-lit and full of personality!
Secondly, you’ll want a series of stunning images that represent what your brand is all about. Use these to break up sections of text and to provide visual examples of the information within your media kit.
A High-Resolution Blog Logo
There’s no doubt that you have some sort of logo in the header of your website, YouTube channel, or any other platforms you use to promote your brand. Therefore, you’ll also want to use this in your media kit to make everything look cohesive.
Don’t have a logo or simply need a re-fresh? We recently wrote a step-by-step guide on how to create your own logo to help you out.
A Screenshot Showing Where Ad Space Is Available
If you run a website or blog, you might offer advertising space or banners on these platforms as one of the ways companies can work with you. If this is the case, it can be helpful to show your potential advertiser where these ad spaces are located on your homepage, along with their size and shape.
To do so, just take a screenshot of your homepage and edit it to include the ad spaces – noting their size and position.
Examples of Your Most Popular Content
Have you created a TikTok that went viral? Or perhaps your blog features an article that has already racked up thousands of reads. No matter what you specialize in, there’s sure to be some content already that you’re incredibly proud of, so why not show this off to potential collaborators?
Include a screenshot or link to this content in a dedicated section of your media kit so companies can get a feel for what you do best and the kind of content you can create for their own brand.
Relevant Statistics
The purpose of featuring key statistics within your media kit is to give some indication about the size of your audience and reach.
If you’re new to the influencer game and your stats are looking low, don’t fret. Instead, be sure to mention milestones or growth you’ve experienced within a short time frame, for example: “in the past 30 days, my unique monthly readers have grown by 300%”. This is exactly what potential advertisers want to see.
In terms of what statistics you should include, consider the following:
- Views per month
- Average views across the last 3 months
- Unique monthly visitors
- Traffic sources
- Reader demographics
- Amount of email list subscribers
- Social media followers
Where you get some of the stats from will depend upon the main platform you use to showcase your work, whether that’s your blog, website, or a specific social media channel.
Testimonials
Testimonials are another excellent technique to demonstrate to companies the significance and value of what you do.
Aim to keep this section succinct, as only 1-2 testimonials should be sufficient. Only a few lines of text (or just a single brief quotation) and an associated image should get the idea across and establishes greater credibility for your work.
A List of the Ways Advertisers Can Work With You
When another company asks for your media kit, it generally means they’re considering working with you in some capacity. Therefore, it’s super important that this document lists all of the available ways you can collaborate with another brand. Companies don’t want to chase up additional information if they can help it, and failing to include these vital details could have them look elsewhere.
Some of these methods of collaboration might include sponsored blog posts, banner advertisements on your website, sponsored videos, or social media posts, for example.
Examples of Previous Collaborations or Features
As an influencer, you may have been featured on other sites or on the social media profiles of note-worthy brands. Including these in your media kit (particularly in an 'As Seen In' section, or something similar) highlights your popularity, as well as the fact that you’ve collaborated with other brands and companies before.
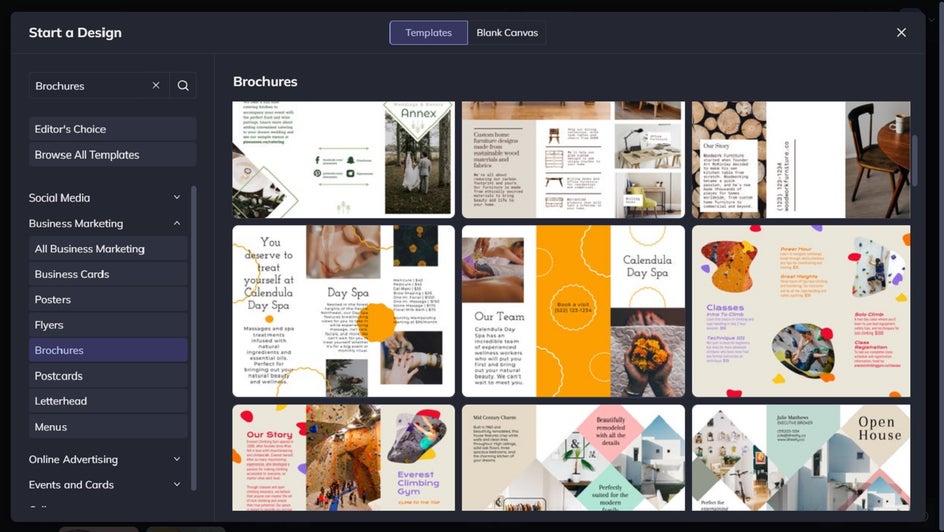
How to Create a Free Media Kit Template Using BeFunky
Now that you know what needs to go in a media kit, it’s time to walk you through the simple process of creating your own free media kit PDF using BeFunky. Simply head to our Brochure Maker to get started. This will bring you directly to the brochure templates within our Graphic Designer.
Step 1: Choose a Brochure Design
There are plenty of brochure templates which will form the basis of your media kit design. There are even free ones you can use, which are perfect for those looking to create a media kit template for free. Simply select the template that takes your fancy, then click Use This Template to begin the editing process.
Step 2: Swap Out the Existing Text
Firstly, you’ll want to input your own text so you can map out what information your media kit will contain, as well as where. You can double-click any existing text box to type in what you want it to say.
When you click on any text in the template, you’ll also notice a Text Properties panel appears. This allows you to adjust elements such as font, size, color, spacing, and more.
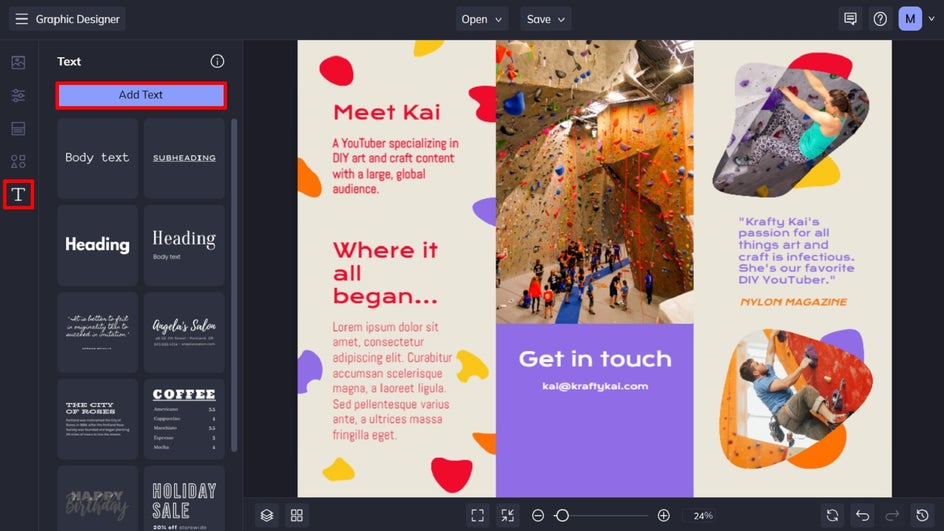
You can also add new text to your design by navigating to Text in the main menu to the left, followed by Add Text.
Step 3: Replace the Existing Imagery
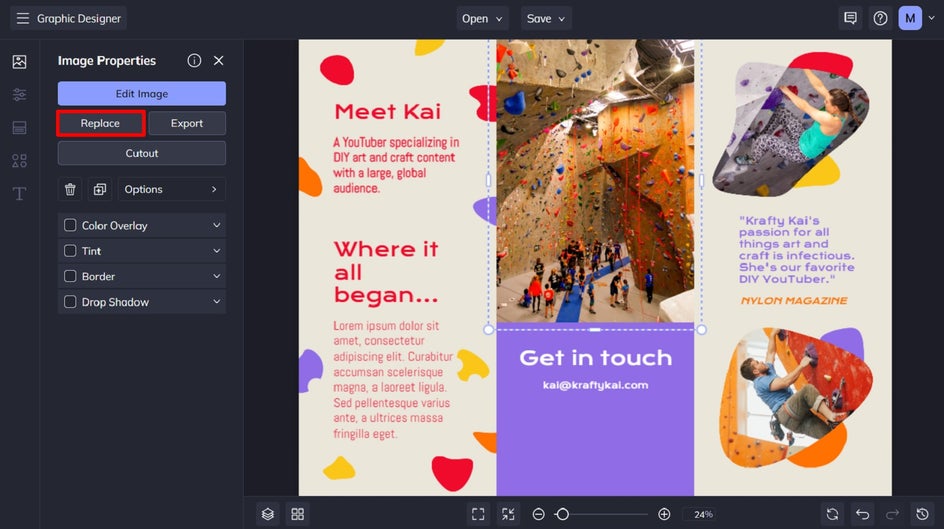
Next up, you’ll want to replace the template’s existing imagery to better reflect your own brand. To do this, click on the existing photo and an Image Properties panel appears. From here, click Replace Image, before choosing your desired image(s) from your computer.
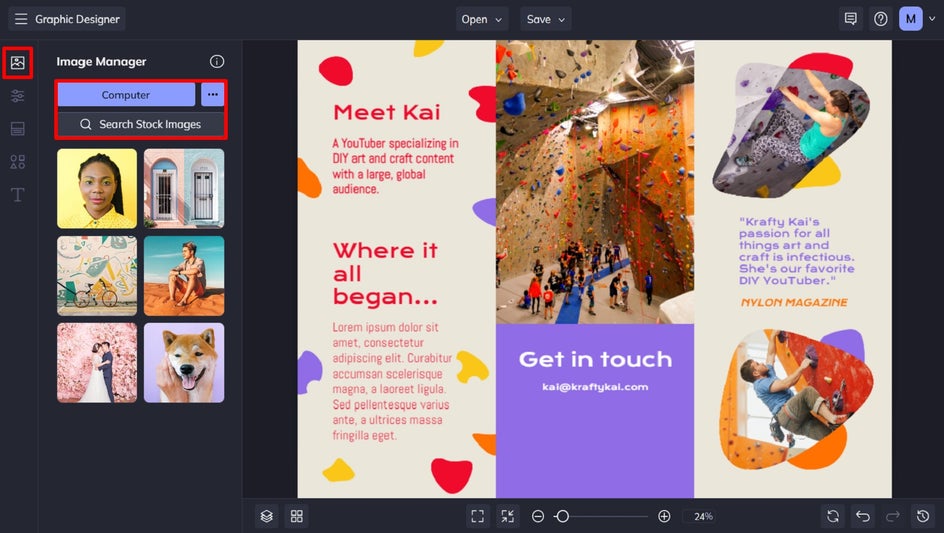
Want to use stock imagery or an image from your BeFunky account or Google Photos instead? Navigate to Image Manager in the main menu on the left, then click Search Stock Images or the three dots (“…”) to access these.
Step 4: Add Any Necessary Graphics
When creating your media kit template, you may also wish to add graphics, such as social media icons, shapes, lines, etc. To do this, click Graphics in the main menu on the left, followed by Search Graphics.

This will open BeFunky’s huge Graphic Library, which is filled with graphics relating to just about any category you can think of. You can type your search term into the search bar at the top left of the screen. Alternatively, browse our Editor’s Choice graphics or explore any of the Popular Tags on the bottom left of the screen.
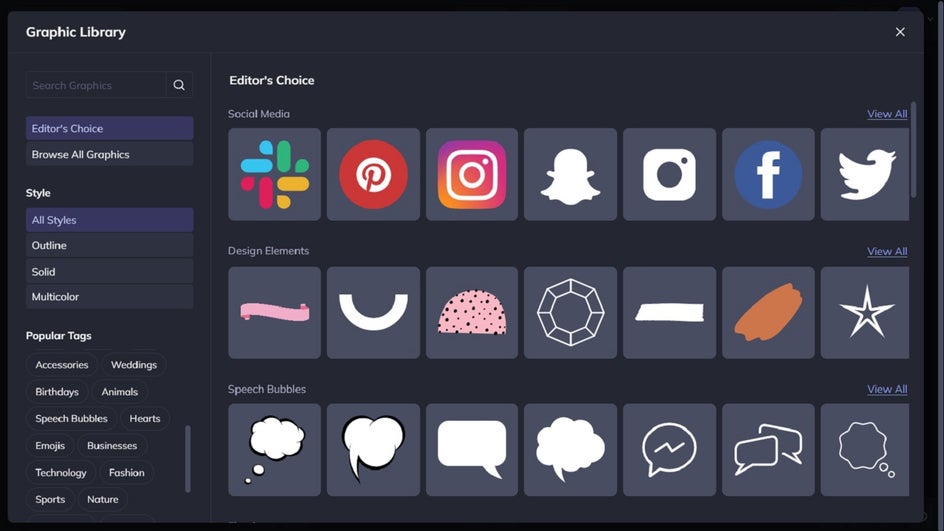
When you see a graphic you wish to use, select it with your mouse. It will then be available in the Your Graphics section once you exit the Graphic Library. Then, simply drag and drop it onto your design.
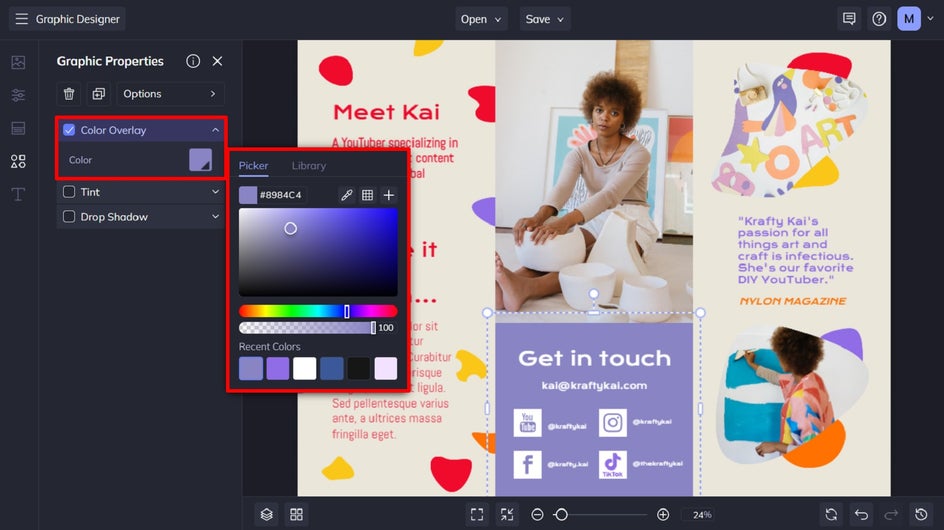
Step 5: Change Your Graphic Colors
Need to change the colors of these graphics so they’re more cohesive with your own branding? Click on the graphic you wish to change, then alter the Color Overlay or Tint from the Graphic Properties panel.
Step 6: Change the Background Color
You may even wish to change the background color of your existing template to ensure it’s in line with the rest of your branding. To do this, navigate to Customize in the main menu. Select one of the color swatches or click the first swatch to access the Color Picker, from which you have an infinite availability of shades.

Step 7: Save Your New Media Kit Template PDF
Depending on how big your media kit will be, you can repeat the previous steps to create additional pages so all of your vital information is included. Don’t fret if you can’t fit all of these details on one page. It can actually be more effective to space this information out over a few pages to prevent your media kit from looking cluttered.
Finally, all that’s left to do is to save your media kit as a PDF so it’s ready to share with potential collaborators. Click Save at the top of the screen, followed by Computer.
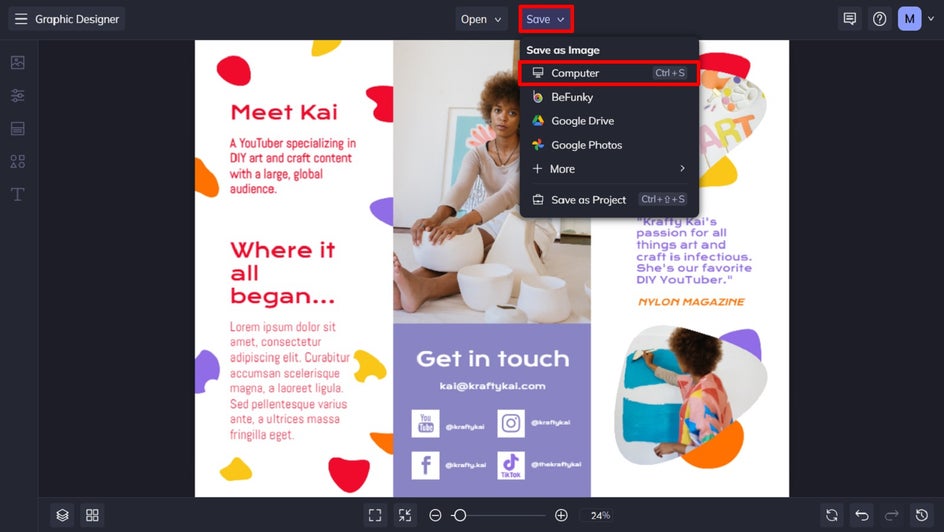
Then, underneath Format, select PDF.
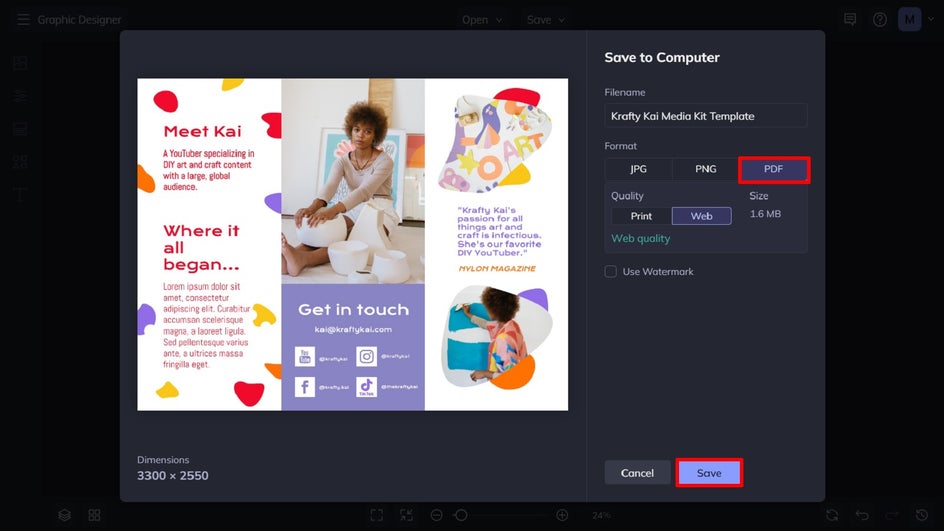
We also recommend you use the Save as Project feature to save your media kit template as an editable BeFunky file that you can continue to tweak as your statistics, pricing, or other information changes over time.
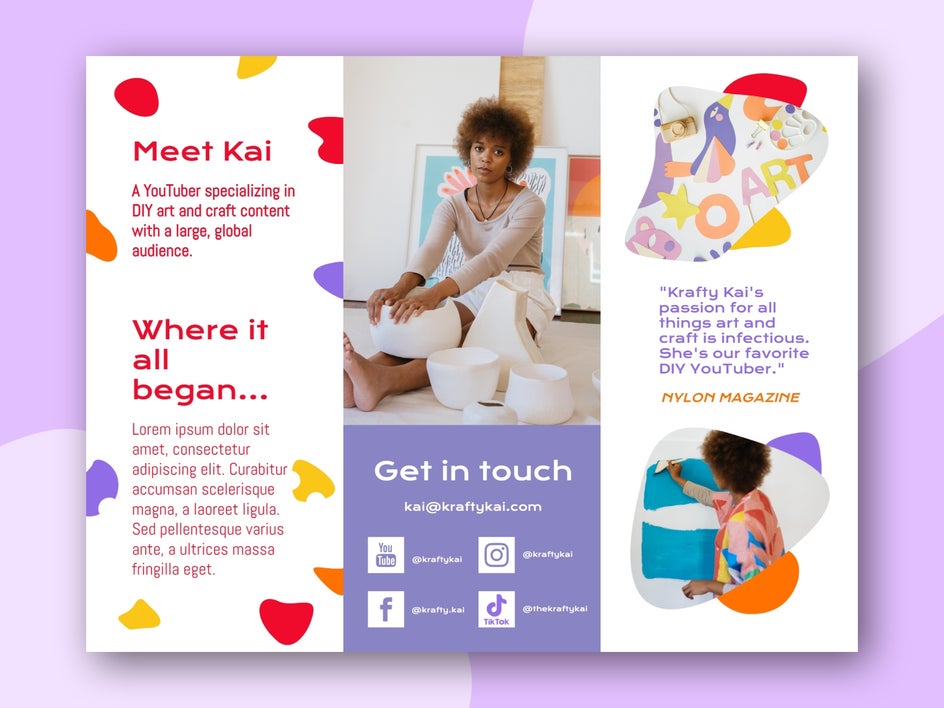
Your Very Own Media Kit Template
Who said creating a stunning and professional-looking media kit had to be expensive? All it takes is a few simple tweaks and you too can have your very own.
Save Time and Money With a Free Media Kit Template
One of the most common questions influencers ask when looking to grow their brand is “how much does it cost to create a media kit?”. Thanks to BeFunky’s wide range of free and customizable templates, you can create a free media kit template in just minutes!
Ready to take your work to the next level and create your own media kit? Head to the Brochure Maker to see just how simple it can be!