Turn Your Photos Into Original Comic Book Art

There’s nothing quite like diving into the richly illustrated world of a comic book. Featuring stylized drawings, vibrant colors, and dramatic shadows, comics turn even the most mundane scenes into something fantastical. How many of us have spent hours of our childhood rereading the same comic book, poring over vivid landscapes, expressions, and action scenes? It’s an art style that fuels the imagination and evokes a sense of wonder – even if it’s found on a bookshelf instead of a gallery.
If you’ve ever wanted to recreate the timeless look of a comic book, look no further than BeFunky’s innovative comic effects. These powerful AI art filters let you transform everyday photos into stylized drawings that look like they came straight out of a comic book panel.
Comics are a huge and varied medium, so you’ll find different effects depending on the style you’re trying to emulate – Golden Age cape comics, gritty noir graphic novels, high-impact action panels, you name it. The category includes highly stylized GFX effects as well as our super powerful GFX+ effects, which are the perfect blend of artistic and realistic. Whether you want to turn yourself into a comic book character, design custom art for a card or gift, or even create your own graphic novel, there’s a comic effect that’s right for you. No drawing experience required - just upload your photo, apply the effect, and customize it to your heart’s content.
How to Turn Any Photo Into Comic Book Art
Ready to create your own comic book art? Here’s how to transform an ordinary photo into vivid, stylized artwork in seconds.
Step 1: Upload Your Photo
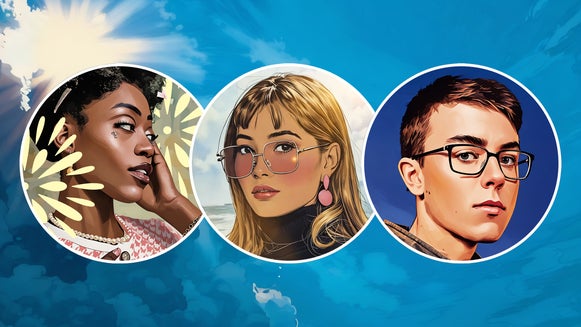
First, open up the Comics category of the Photo Editor and upload your photo. If you already have an image open in the Editor, you’ll find the comic effects under the Artsy tab.

Here you can access BeFunky’s whole selection of comic-inspired AI filters, with styles ranging from vintage superhero comics to twinkly-eyed manga. Click on any of them to instantly see a preview of the effect.

Once you’ve decided on a comic effect to use, either click the check mark to use it as is or click the Settings button to customize it further! Here we’re going to be using Modern Comic GFX+, which provides detailed lines, crosshatched shadows, and realistic colors.
Step 2: Customize the Comic Effect
If you’ve chosen to customize the comic effect, you’ll now see a few adjustment sliders. The available settings will depend on the effect you’ve picked – some have more customization options than others.

In this case, the Fidelity slider adjusts how close the artwork resembles the original image. Increase it for greater realism and decrease it for heavier stylization. The Variation slider provides eight slightly different versions of the filter so that you can pick the art that speaks most to you. Tweak the settings until you’re happy with the results, then click Apply.
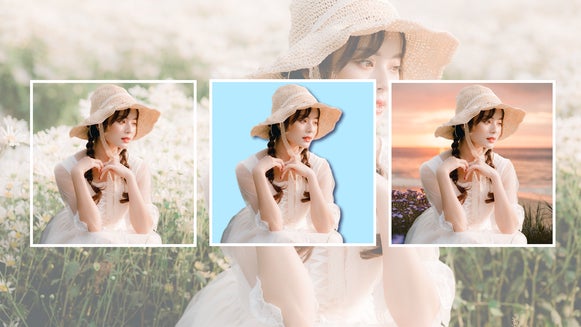
Step 3: Save Your New Comic Book Art
Click the Save button at the top of the canvas and select your desired file type and save location. A high-quality PNG or JPG is best for digital use, while a high-quality PDF is perfect for a printed card or framed artwork.

Photo to Comic Final Results
In just a few clicks, our new comic book art is ready! The effect has turned an ordinary photo into a dramatic scene that looks straight out of a graphic novel. This comic-style portrait can be turned into an avatar for social media, combined with more photos to make a comic book page, or used in other design projects!

3 Inspiring Ways to Use Comic Effects
Thanks to the Photo Editor, hand-drawn comics are easy and fun to recreate. But what can you do with a piece of custom comic book art? As it turns out, the opportunities are endless – from making your own graphic novel to designing your own wall art. Here are a few of our favorite ways to use comic effects in our graphic design projects!
Create Your Own Comic Book
When applied to multiple photos, BeFunky’s comic effects can be used to make your own comic book or graphic novel! Stitch together panels in the Collage Maker and use the text tool to add dialogue. The Batch Photo Editor makes it easy to apply the same Artsy effect to dozens of photos at once, saving time and effort. This example uses Soft Anime GFX+.

Design Custom Birthday Cards
A store-bought birthday card has nothing on one that’s handmade – especially when it has custom art. Use a portrait of the recipient or a picture of their favorite furry friend to create a personalized birthday card that they’ll want to keep forever. Combine the comic art with the Detach Subject tool and a few graphics to really make it stand out. Here we’ve used Neo Comic GFX+ and Pop Comic GFX.

Make Vintage Comic Posters
Take inspiration from mid-century comic book covers and panels to create an eye-catching custom poster. This first example uses Vintage Comic GFX while the second uses Action Ink GFX+. Use a bold font pairing for the title and subtitle. Consider adding an authentic paper texture with an overlay blend mode. You can then order the design as a printed poster or canvas directly from the Graphic Designer.

Recreate Your Favorite Comic Books With BeFunky
With Artsy effects, any photo can be transformed into a work of art. The boldly inked lines and vibrant colors of comic effects create pieces that feel both nostalgic and timeless. Whether you want to spruce up your social media, print a custom gift, or even produce your own comic book, these effects provide the perfect hand-drawn look in seconds. Try out comic effects for yourself today!