How to Create a Scrapbook With the Collage Wizard

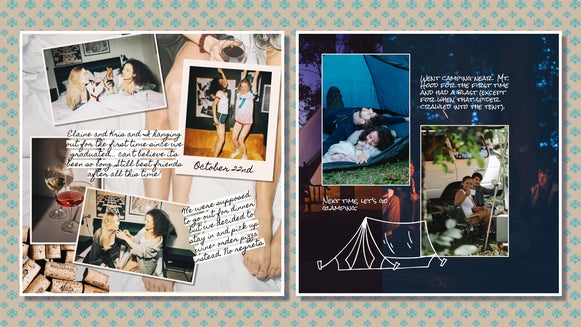
People have been documenting their lives by collecting letters, drawings, and ephemera since at least the 15th century. By the 1980s, this hobby was transformed into scrapbooking as we know it today – including patterned paper, layered photos, vinyl stickers, handwritten captions, and printed memorabilia. These scrapbooks provide both charm and function, serving as personal historical records while also showcasing the personality of the one who made them.
In the digital age, simply posting your latest snapshots on social media has become much more popular than scrapbooking – after all, it’s cheaper, faster, and more accessible. But what if there was a way to get the best of both worlds? With digital scrapbook pages, you can recreate that hand-crafted multimedia charm without any of the expense or mess. And with BeFunky’s Collage Wizard, you can design your own digital scrapbook layout online in just a few minutes – no bulky or expensive software required.
Digital Collages: The Simplest Way to Scrapbook
You could start your digital scrapbook from a blank canvas, but even when working digitally, finding the best layout for all your photos takes time. This is where the BeFunky Collage Maker comes in. Instead of spending time painstakingly rearranging photos and searching for patterns and graphics, the built-in Collage Wizard allows you to browse dozens of automatically generated layouts and pick your favorite. After that, you can quickly access tons of cute patterns as well as hundreds of hand-drawn vector graphics to add to your scrapbook design. With the Collage Maker, it’s never been simpler to show off your creative flair!
How to Make a Digital Scrapbook in Seconds
One great benefit of using the Collage Wizard to create your digital scrapbook pages is that even if your photos all have different aspect ratios, the Collage Wizard will quickly find a way to display them all on a single page. You can then add some handmade, layered charm by adding graphics, text, scanned ephemera, and even other photos. Here’s how it works:
Step 1: Upload Your Photos
To get started on your scrapbook collage, first head to BeFunky’s Collage Maker and upload your photos to the Image Manager. You can scrapbook about anything, whether that’s a recent trip, a day out with friends, or an important life event like a wedding or graduation. At this stage, if you haven’t decided exactly which photos you want to use, don’t worry – you can experiment with different options in the next step.

Step 2: Pick a Collage Wizard Layout
Next, click on the Layouts tab and open up the Collage Wizard.

Here you can select all or some of the scrapbook photos you just uploaded. Once you’ve chosen your photos, click Use Images. The Collage Wizard will immediately generate a variety of options for your scrapbook collage layout using every photo you’ve selected.

Once you’ve found your favorite layout out of the Collage Wizard’s many options, click Select this Collage to continue.
Step 3: Add a Handmade Touch
Once you’ve selected your base collage layout, it’s time to recreate all the charm and detail of a physical scrapbook. First, customize the image spacing and background color of your canvas in the Customize tab.

For an authentic scrapbook feel, you can also add a colorful patterned background in the Patterns tab.

Now add Graphics and Text to your heart’s desire. Don’t be afraid to let elements overlap – this layering technique is what will really make your digital scrapbook page look handcrafted.

Speaking of layering, at this point you may also want to head back to the Image Manager to layer additional photos and any printed memorabilia you may have scanned like tickets, brochures, receipts, and letters. Don’t be afraid to get maximalist with it! If you want to touch up a photo, cut out a background, incorporate textures, or add an effect to an image, you can click on any photo to access the Image Properties menu.

Here you can make photo edits without ever leaving the Collage Maker or use the Cutout tool to instantly remove the background of an image.

Step 4: Save and Share
After you’ve customized your scrapbook page to your heart’s content, it’s time to Save your design, either as a high-quality PNG for digital sharing or a print-quality PDF for printing.

You can share your new scrapbook collage on social media, frame it as home decor or as a gift, or even print it out to keep in an actual scrapbook. Now that you know how to design a personalized digital scrapbook page, it might just become your go-to method for capturing all your favorite memories.

Scrapbook Collage Inspiration
Want to add even more creative flair to your scrapbook pages? Here are some digital scrapbooking techniques that take advantage of all that the Collage Maker and in-platform Photo Editor have to offer.
Painted Layers
Using a freeform collage layout, apply an Artsy effect like Oil Painting GFX on background photos and cutouts to create a stunning multimedia scrapbook layout in seconds. You can use different effects across different photos for a truly junk journal-style look – for instance, try combining a black-and-white sketch effect with a colorful watercolor effect.

Museum Gallery
Create a completely unique scrapbook collage by adding digital photo frames to each image and using the Text tool to create museum label-style captions. This method works best if you only have 2-3 images, helping you recreate the minimalist museum look.

Realistic Textures
Adding Textures to your collage photos can make your scrapbook page look even more authentic. The Photo Editor provides textures to replicate paper, fabric, metal, light leaks, and more. Can’t find the texture you’re looking for, or want to apply one texture to the entire page? Try using a close-up photo or scan of a textured material and overlaying it on top of all of your photos with a blend mode.

Record Life’s Best Moments With the Collage Maker
Your memories shouldn’t be lost in the sea of your endless camera roll. With digital scrapbook collages, you can record your life intentionally and creatively, making each memory even sweeter. The Collage Wizard lets you skip the tedium of arranging photos so that you can focus on the artistic process. It’s an opportunity to create something uniquely personal without any of the cost or mess of traditional scrapbooking. Create your first scrapbook collage today in the Collage Maker!