How to Make a Collage Twitter Header

A header is an important factor in your Twitter profile. The social media header is one of the first things someone sees as they explore your profile. Whether your Twitter profile is for a business aimed at acquiring new customers or a personal profile trying to expand your brand, creating a compelling Twitter header can help draw in followers. What’s even better is to make it a collage to add more character.
BeFunky’s Collage Maker offers a range of layouts to design your Twitter header. Each layout can be fully customized to your unique brand. Play with colors, graphics, fonts, and more to make your Twitter memorable. Follow this tutorial to create your perfect Twitter collage header.
How to Make Your Twitter Header Collage
When using BeFunky’s Collage Maker you can choose from several layout options. Choose from any number of photos and layouts that best suit your personal or business style. Keep reading for a step-by-step on how to build an eye-catching social media header.
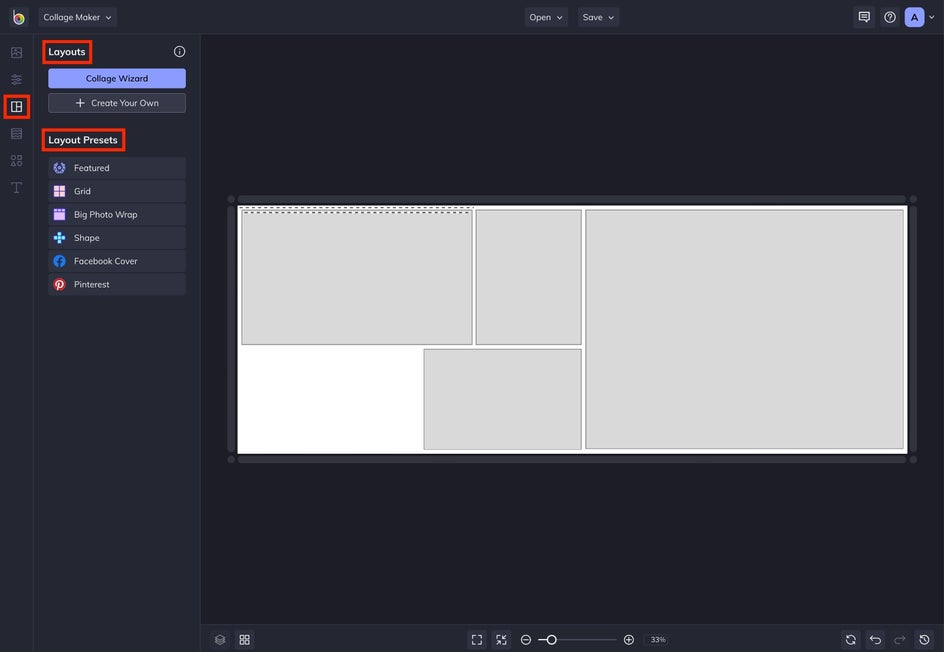
Step 1: Select Your Twitter Header Layout
As you enter the Collage Maker, first navigate to Layouts. This is the third icon from the top in the vertical left icon menu. Within this tab, you’ll see Layout Presets. The dimensions of a Twitter header are 1500x500 pixels. The layout dimensions can be adjusted in the Customize tab, the second icon from the top. Keep this in mind as you’re selecting and sizing your layout.
Step 2: Add Your Photos & Change the Background Color
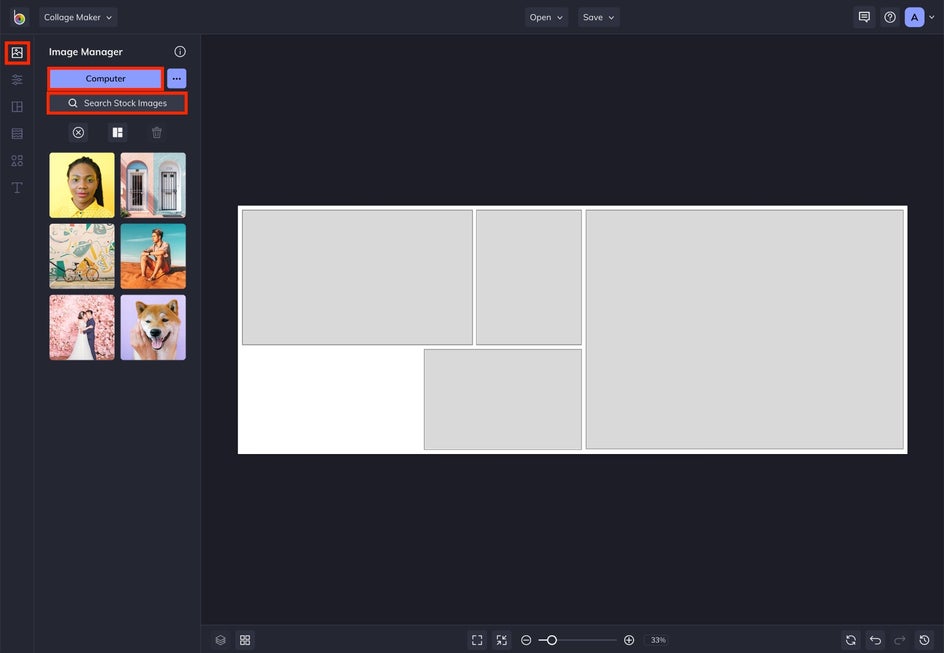
The next step is to incorporate your personalized photos and change the background color as desired. Click into Image Manager, the topmost icon in the left icon menu. From here you can choose to upload your photos by clicking the blue Computer button or choose photos from BeFunky’s large image library by clicking Search Stock Images.
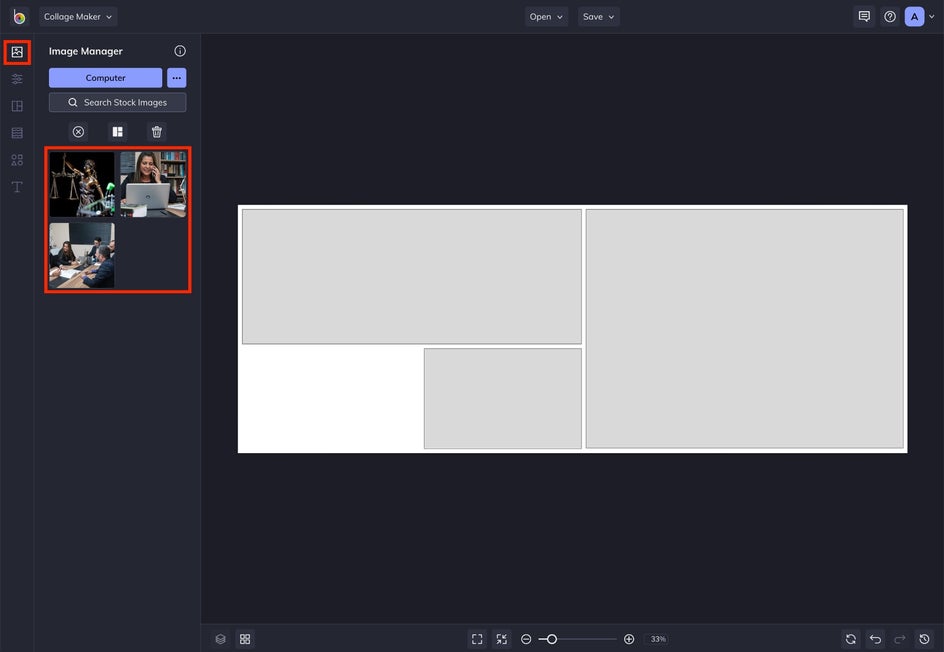
For this example, we’re creating a Twitter header collage for a law firm. When your photos have been uploaded, they will appear on the left menu of the Image Manager. Click and drag each photo to where you want it to appear on the collage. Feel free to delete or add image cells as you wish to ensure you can add as many photos as you’d like.
Now, it’s time to change the background color. A general rule of thumb is to stick to a pallet of three to four colors in your Twitter header. Make sure they are colors that align with your personal or professional brand. To do this, click on Customize, the icon that is second from the top.
Pro Tip: Pro Tip: In Customize, you can also change the width and height of your layout to match Twitter’s header sizing standards.
Within the Background Color submenu, you’ll see a small black triangle in the lower right corner of the first colored square. Click this black triangle to open a pop-up menu to choose the background color. Use the Eye Dropper Tool to select a color from one of the photos you’ve uploaded for cohesivity throughout your Twitter header.

Step 3: Add Your Text
One of the most important elements of your Twitter header is the text. Instead of using basic fonts to express your or your business’s name, you can add your logo or additional design around the text. To add text to your layout, navigate to the Text menu by clicking the “T” at the bottom of the icon menu. From here, click the blue Add Text button to create a text box.

Use the white dots that appear in the corner of the selected text box to adjust the size of the box. When the text box is selected, the Text Properties menu will open. You can change the font, size, and color of the text within this menu. You can also play around with backgrounds, outlines, highlights, drop shadows, and more to further enhance your text.

Pro Tip: If you have a slogan or any other unique copy that could enhance your layout, try adding it to your Twitter header to make your brand feel all the more unique.
Step 4: Upload Graphics
Now that you’ve added text, it’s time to play with graphics. Click on the icon that is second to the bottom of the vertical icon menu. Like when you added photos, you can add graphics by clicking the blue Computer button or choosing from BeFunky’s library by selecting Search Graphics.

Choose to keep your graphics simple or go a bit bold - whatever is most true to your brand. Try adding borders or small graphics that align with the message you want your Twitter profile to express. When you select your graphic, it will appear under Your Graphics. Double click or click and drag each graphic for it to appear in the layout then use the white dots at the corner of the selected graphic to adjust its size and location on the layout.

Step 5: Save Your Creation
When all the elements of your Twitter header are complete, it’s time to save your creation. Click the Save dropdown menu at the top of the Collage Maker and save the layout to your computer to easily upload it to Twitter. Well done! You’ve just created a fun and unique Twitter header that will catch the attention of everyone who comes across your profile.

Collage Your Twitter Header
By designing your own Twitter header collage, you can customize how people see and remember your brand. Using BeFunky’s Collage Maker to create a Twitter header is simple and easy. Follow these steps to make your eye-catching Twitter header collage!
