Photo Editing 101: Top 5 Problems and Solutions

We all enjoy taking photos of the things we love, but what happens when issues such as poor lighting, contrast issues, or dull colors ruin the moments we want to cherish?
Thankfully, BeFunky’s Photo Editor is home to a wide range of easy-to-use photo editing tools, allowing anyone to create beautiful images without special skills or technical expertise. With so many photo editing tools at your fingertips, however, it’s easy to become overwhelmed. After all, which ones should you use, and why?
To help you master your entire photo editing process, let’s take a closer look at some common photo editing mistakes, as well as how you can fix them, in just a few clicks! You don't need to be a professional photographer to achieve professional-level results. These basic photo editing techniques and tips will help elevate your photography game to new heights.
Problem 1: Poor Composition, Unwelcome Distractions, or Incorrect Aspect Ratio
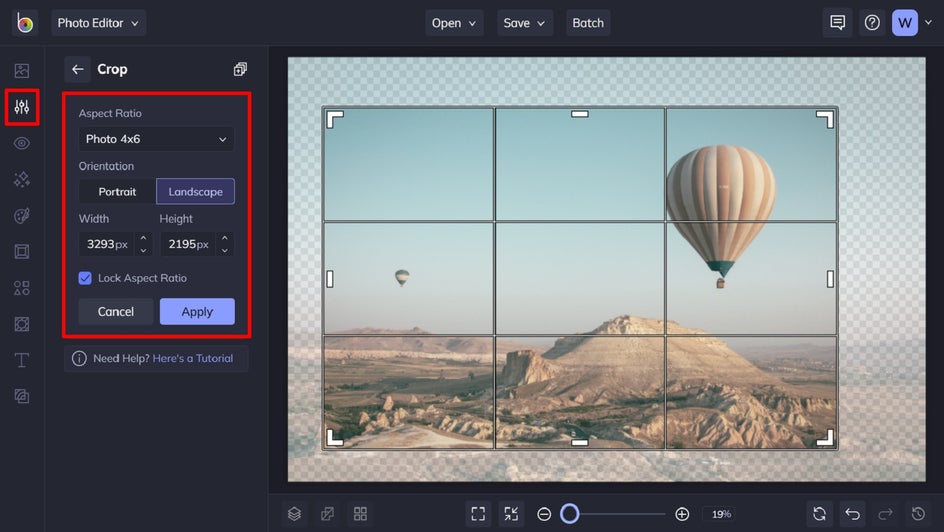
Composition refers to the way you framed or positioned your shot. What did you capture in the foreground, middle ground, or background? Did you want your subject in the center of your image, or off to one side? When editing photos, think of the Crop tool as an invisible frame drawing the viewer’s gaze to what is most important. To access it, simply navigate to the Edit menu of the Photo Editor, then select Crop.
Too much noise in an image is anything you don’t want to be featured in your photo. It can also be something that might distract the viewer, especially when it comes to landscape photography, where there's a lot of space. To achieve noise reduction, simply use the Crop tool to trim these out of your image!
Cropping can also be used to change an image’s aspect ratio (i.e., what the image’s width is in relation to its height). The Crop tool offers a range of different presets to help take the guesswork out of getting your crop dimensions and aspect ratios right. Want the perfect Instagram grid, for example? The square (1:1) crop will create perfectly square images. Need to turn your favorite holiday snap into a Facebook cover photo? Simply select Facebook Cover from the Aspect Ratio dropdown menu to achieve that.
Problem 2: File Size Is Too Large
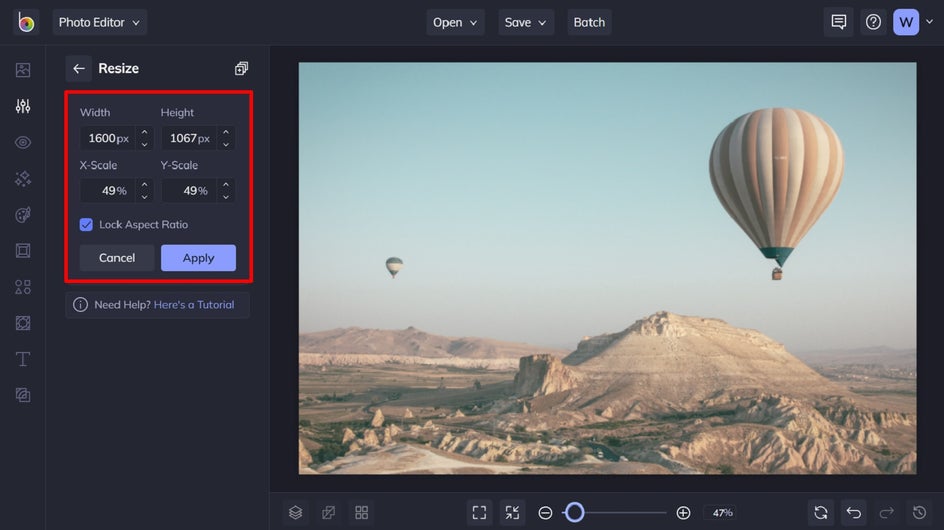
Cameras are advanced tools that capture images containing millions of pixels. This can send the file size through the roof. So if you wish to use your image on the web, chances are it’ll need to be made smaller to upload successfully. Platforms like Facebook will automatically adjust images to their preferred size, lowering both the resolution (the detail an image holds) and the image quality. To be in control of how your image looks, it’s a good idea to do the resizing yourself using our Photo Editor’s Resize tool. You can access this by navigating to the Edit menu, followed by Resize.
Here’s the thing though: people often confuse resizing with cropping and don’t know which one to use and when. While cropping removes parts of your image, resizing doesn’t. It simply alters the dimensions of your photo to make it larger or smaller. Cropping can be used in combination with resizing images to help you achieve the exact print size you’re looking for.
You can resize images into the perfect dimensions for printing and framing using our clever chart. It lists the most common photo-printing sizes, along with their corresponding dimensions in pixels.
You should always err on the side of caution when you resize images. Adjusting your photo’s height and width in a freehand way could lead to it becoming stretched or losing detail. The best way to combat any resizing blunders is to lock the Aspect Ratio. That'll keep the dimensions in your photograph in proportion to one another. In other words, if you adjust the height of your photo, the width will adjust accordingly, keeping the whole image balanced.
Another resizing mishap to avoid is known as "uprezing." This is when you increase the size of a low-resolution image beyond its capabilities, resulting in blurring and distortion. Be sure not to sacrifice your image quality!
Problem 3: Poor Exposure
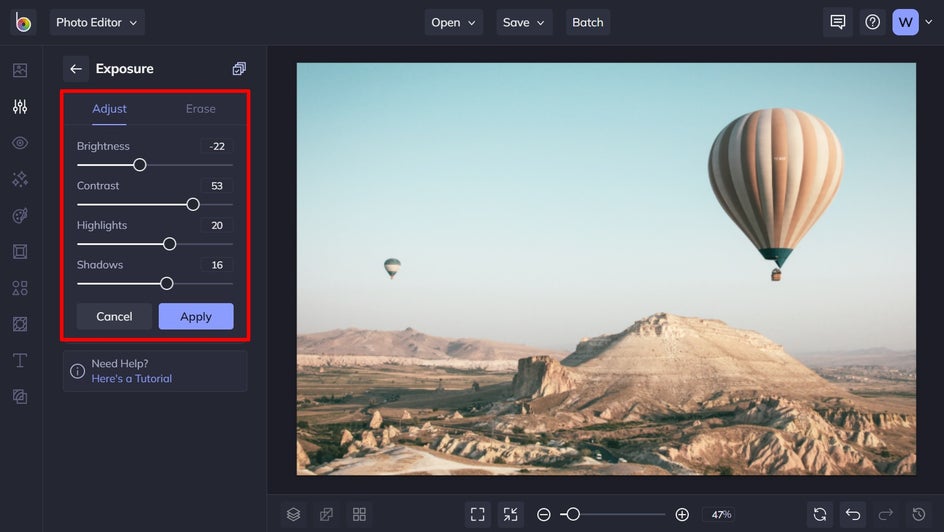
Exposure relates to how dark or light your image appears once it’s been captured by your camera. Getting this right from the get-go can be tricky though. It comes down to the perfect harmony between aperture, ISO, and shutter speed. In other words, how much light your camera lets in, the sensitivity of your camera’s sensor to this light, and the duration of the exposure.
If your original photo is underexposed (too dark) or overexposed (too light), you can easily fine-tune it by using the Exposure tool in BeFunky’s Photo Editor, located in the Edit menu. It allows you to alter 4 exposure-related elements, including Brightness, Contrast, Highlights, and Shadows.
There are a number of other tools available in our Photo Editor that can also help you perfect your photo’s exposure. The Levels tool gives you more advanced control over your image’s exposure, as it lets you adjust the highlights, mid-tones, and shadows individually. Alternatively, the HDR DLX feature (standing for High Dynamic Range) uses adaptive technology to bring out those realistic details and enhance your image. Finally, the A.I. Image Enhancer uses Artificial Intelligence to correct exposure, adjust brightness, balance highlights and shadows, and enhance the colors in your image in just a single click.
Problem 4: Lacks Clarity
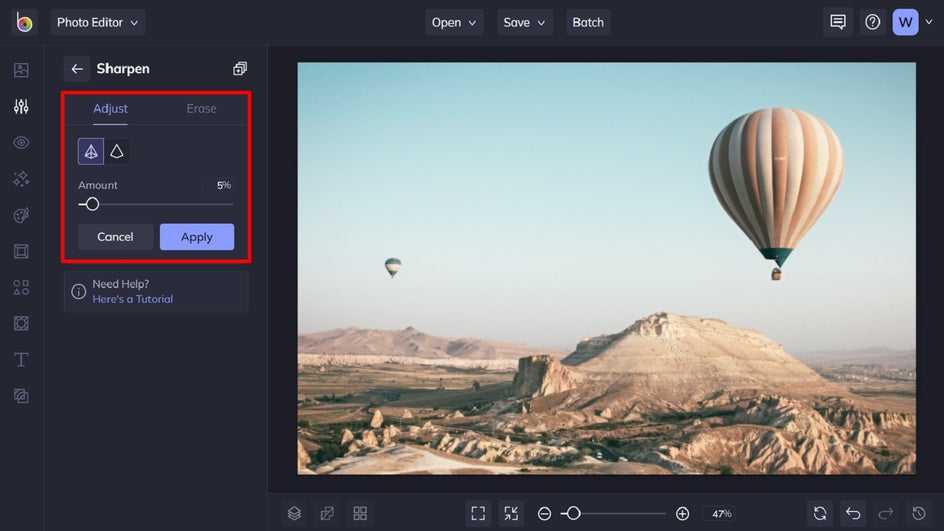
If the details of your digital photography lack clarity, sharpening it enhances the contrast along the edges of your original image, which makes it look sharper overall. The Smart Sharpen tool is built on a 'smarter' algorithm, allowing it to only enhance certain edges within the photo that need it most. For a subtly sharper look, you can also edit photos with the Sharpen tool.
A word of warning though: The tip to achieving a perfectly sharp photo is to not overdo it! Increasing your sharpness too much can cause pixelation and unwanted graininess. It’s also important you view your image at its exact (100%) size when adjusting the sharpness. You want to ensure you’re getting it just right.
Other helpful tools to help you perfect an image include Sharpen DLX, which senses the difference between the sharper and softer edges in your photo and applies just the right amount of contrast to bring out those finer details. Do avoid too much sharpening, though, as it can make your image look grainy.
Boosting the colors in your photo can also add clarity and make its details pop. The Vibrance and Vibrant Colors DLX tools are perfect for doing just that!
Problem 5: Dull Colors
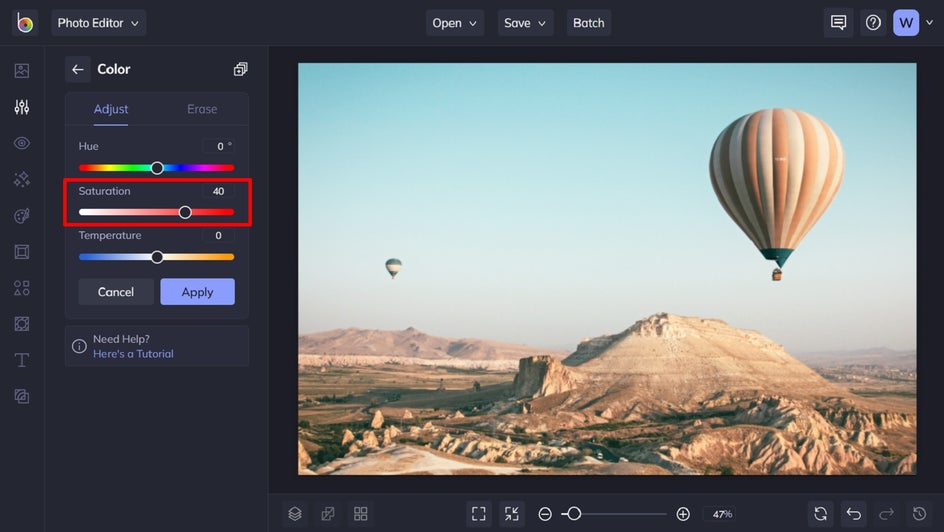
Speaking of boosting your photo’s colors, this is a common image editing requirement to counteract a dull image. Saturation defines how intense the colors are. When you increase the saturation, higher tones of the color spectrum are added, making the colors appear more vivid. On the other hand, decreasing saturation adds lower colors of the spectrum to your image, making its colors appear duller.
You can tweak the saturation of your photo by navigating to Color in the Edit menu, then adjusting the slider located underneath Saturation.
While increasing the saturation of an image can really make it pop, you must be careful to avoid one of the most common photo editing mistakes: oversaturation. When you add the appropriate amount of saturation to your photo, it creates a more beautiful and eye-catching image that still appears realistic.
If you don’t want to bump up the intensity of all colors in your shot (which can easily lead to oversaturation), the Vibrant Colors DLX tool will only increase the intensity of more muted colors and leave the well-saturated colors alone – all in a single click!
Final Results – Easy Photo Editing Tools
With just a few simple tweaks, we’ve turned this average photo into an aesthetically pleasing, visual masterpiece. It's easy to make any photo look professionally edited with BeFunky's suite of image editing tools.


Masterful Photo Editing With the Photo Editor
There you have it – the fool-proof steps for turning any photo into a masterpiece, along with the five common image editing problems you can overcome using our Photo Editor’s cutting-edge tools.
Our A.I. Image Enhancer and A.I. Portrait Enhancer, as well as DLX effects (including Sharpen DLX, HDR DLX, Denoise DLX, and Vibrant Colors DLX), also offer one-click solutions to many of the tools above. They’re so smart, in fact, that you won't have to worry about overexposure, oversaturation, or over-sharpening again. No need to use complicated tools like Photoshop to edit photos to perfection. To see just how easy it is, start editing images today!