How to Reshape Photos With the Slimming Tool

Because cameras have different focal points to the human eye, they often distort images and make the subject of a photo look wider than expected. This is especially true of compact lenses like those in your smartphone. In the past, making adjustments to this kind of distortion was complicated and required expensive software. But now, the Photo Editor’s intuitive Reshape tool can be used to correct wide distortion and slim subjects in just seconds.
Reshape can be found alongside the Photo Editor’s full range of Touch Up tools for everything from whitening teeth to adding makeup, and it’s perfect for those times when the camera captured things wider than usual. It works to shrink the pixels in your image, transforming any area of your photo into a slightly smaller or slimmer version. With several customizable sliders, Reshape can be used on individual features as well as entire subjects. In this article, we’ll show you how to use the Reshape tool to transform objects or correct wideness in photos effortlessly.
Reshape Tool vs. Slimming Tool
The Photo Editor also offers a Slimming tool, found in the Miscellaneous section of the Touch Up tools. This tool works to slim and lengthen the entire photo, resulting in a slightly narrower image. On the other hand, the Reshape tool can be used to customize individual areas of a photo and does not affect the aspect ratio of the photo at all.

Reshape can also be used to smudge or expand areas of an image as well as slim them. Overall, the Reshape tool is much more customizable and effective for most touch up uses. However, the Slimming tool still works if the goal is narrowing an entire scene or subject.
How to Use the Reshape Tool to Slim Photos
When you’re ready to get started, head to BeFunky’s Touch Up tab and follow along.
Step 1: Upload a Photo
Upload the image you want to slim by clicking Open or simply dragging and dropping the file directly onto the canvas.

Step 2: Adjust and Apply the Reshape Tool
The Reshape tool can be found in the Essentials category of the Touch Up tab. For slimming, toggle the Reshape tool to Shrink. Use the adjustment sliders to change the pressure, brush size, and strength depending on your needs. The pressure slider affects the intensity of your brush – turn it up to make drastic changes quickly. The strength slider can be used even after the tool is applied to make the slimming effect more or less acute.
Tweak the sliders as needed, then brush over the photo to make adjustments. Watch out for straight lines and horizons – reshaping them too much can cause the image to look wonky overall. Once you’re satisfied with your adjustments, simply click Apply.

After reshaping, feel free to make use of the Photo Editor’s hundreds of other tools. This includes simple edits to lighting and color, as well as effects like toning filters and the AI Portrait Enhancer.
Step 3: Save Your Slimmed Photo
Alternatively, head directly to the Save menu at the top of the canvas. Save as a PNG for the best resolution, a JPEG for a smaller digital file, or a PDF for printing.

Here are the final results of our reshaping! With just a few subtle tweaks, we were able to shape our watermelon just right.

More Ways to Use the Reshape Tool
The Reshape tool isn’t just great for slimming objects. Use it to fit more details into limited aspect ratios, correct lens distortion in portraits, exaggerate specific elements of a photo, and more. With three different reshaping options, including Smudge, Expand, and Shrink, the possibilities are endless.
Fit More Details
If you’ve ever taken a beautiful travel photo only for social media to crop it at an awkward spot, try using the Reshape tool to squeeze the edges and fit more details in. Here, we used it on a city skyline to fit some more buildings into the 1x1 ratio.
This method is a great option for subtle fixes, but if you’re looking to change an aspect ratio even more drastically, try our Expand AI tool.

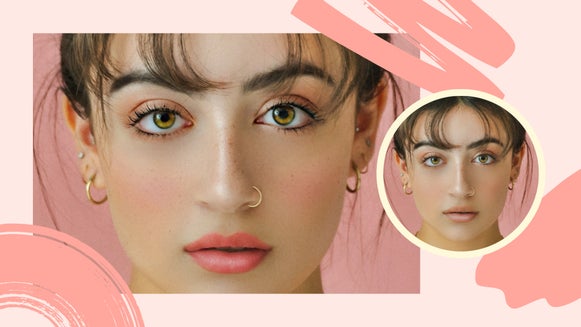
Correct Portrait Distortion
Portraits, especially those taken at close range, often suffer from uncomfortable distortion. Use the Reshape tool to fix unwanted distortion in headshots and combine with the AI Portrait Enhancer for a truly elevated portrait. You can even apply these effects right from your phone.

Exaggerate Features
Smudge, expand, and shrink different areas of a photo to exaggerate certain features like this pug’s cute rolls and folds. This tool can be used for unique album art, creating a surrealist pop art piece, or making your own memes.

Correct and Control With Reshape
You can’t always get the perfect shot in the moment, but the Reshape tool makes it easy to fix distortion, edit features, and exaggerate elements for dramatic effect. Whether you’re aiming for a subtle effect or a big transformation, the end results are completely within your control. Explore Reshape today in BeFunky’s Touch Up tab!