Best Practices for Printing High-Quality Photos
We all love photographing our travels and adventures, and we love uploading them online to share with everyone. But social media can sometimes feel cluttered and impermanent. What do you do when you have an extra special memory you want to preserve? Printing photos is a simple, beautiful way to highlight a precious moment in time, and will provide you with a physical memento that you can display for years to come.
Preparing photos for printing can be daunting. You might be concerned about the size, quality, and composition of the photograph you want to print. But don’t worry! There are many ways to adjust a photo to your liking in BeFunky’s Photo Editor, and we’ll teach you all about printing best practices so that you get a high-quality result.
In addition to helpful tips and best practices, we’ll provide a full tutorial on editing photos for printing in BeFunky. Soon you’ll be ready to start decorating your home with your art or turn your work into thoughtful gifts for your friends and family. Read on to learn how to ensure a perfect print, every time!
Best Practices for Printing High-Quality Photos
Printing photos can be expensive, especially when you get to larger sizes, so you want to make sure that you have a high-quality, wall-worthy photo. Sometimes an image that looks pretty on a phone screen doesn’t translate well to a physical print! Luckily, there are ways to adjust any photo and check it for quality so that it looks great in your home.
Always Keep a Copy of Your Original File
To get a perfect print, you’ll want to edit your photo to make sure it’s looking its best. However, it’s important to set aside an unedited version of the original image in case you make changes you’re unhappy with later. To do this, simply duplicate the file on your computer. Edit one file and leave the other untouched.
Check Your Dimensions and Resolution
A common mistake people make when printing their photos is to disregard their photo’s dimensions and assume it can simply be scaled up or down to fit their desired print size—all without losing quality.
When resizing your photo for printing, you should multiply the desired height and width in inches by 300. This will give you a Dots Per Inch (DPI) of 300, which is the minimum you’ll need for high-quality printing. For example, if you’d like an 8” x 10” print, the image will need to be at least 2400px by 3000px.
However, something to keep in mind is that if your image is already smaller than 2400 by 3000px, increasing its size will likely result in a loss in quality. Always use the Resize tool to size down rather than up!
Perfect Your Photos in Post
Even the most experienced photographers don’t get the perfect shot in just one click. That’s what the editing process is for! Once you’ve decided which photos you wish to print, upload them into the Photo Editor to get them looking picture-perfect.
To post-process a photo and make it 100% print-ready, we first recommend straightening the image using the Tilt tool, especially if the horizon is visibly askew. If the photo is a little blurry, you can always adjust the Sharpness to make the subject stand out. Adjusting the Exposure and Color can change the mood of your photo instantly. Try playing around with the sliders to see what combination of adjustments works best for you!
Crop for a Clean Composition
Accidentally captured a stranger or unwanted object in the corner of your image? Or perhaps the subject of the photo isn’t quite centered? To fix your photo’s composition or cut out unwelcome distractions, you can use the Crop tool before printing. Don’t forget to check the dimensions in the sidebar to make sure you’ve got the correct ratio of height and width!
Consider Your Print Medium
From paper to canvas to fabric to specialized photo paper, there are seemingly endless mediums available for you to print your photo on. It’s a good idea to consider which medium you want early on, as certain images will work better with certain finishes.
Matte paper, for example, is great for producing high-contrast images as it holds plenty of black ink. This makes it more suitable for black and white photos. Photos with rich colors, such as landscapes, will look better on glossy paper that allows every color to shine through. Just do a bit of research beforehand and you’ll be able to find the printing medium that’s right for you.
Do a Test Print
Finally, where possible, we recommend that you do a test print of your photo to ensure that it looks exactly how you envision it. Because images on screens often look very different from how they appear when printed, doing a test print allows you to avoid any printing mishaps or disappointments. This is especially applicable if you’re going to print multiple copies! There’s nothing more heartbreaking than receiving a hundred of the same print only to realize you left a stray pixel in the corner.
How to Prep Photos for Printing in BeFunky
Want to prepare your photo for printing? To get started, first head to BeFunky’s Photo Editor and upload your desired photo. You’ll be hanging your pictures up in no time!
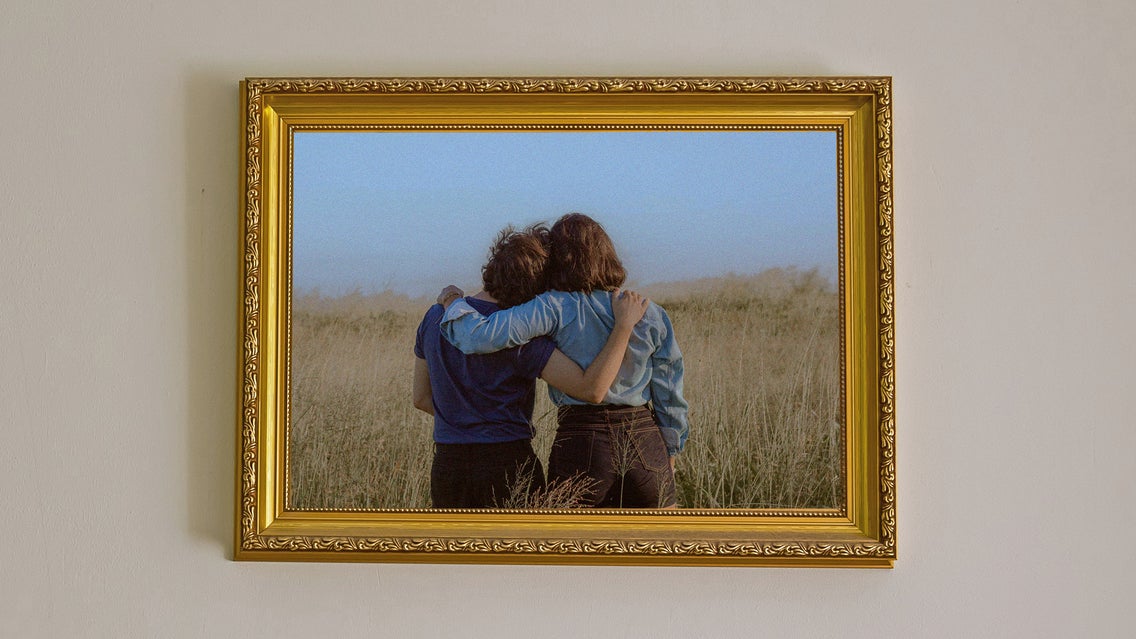
Step 1: Calculate Your Dimensions & Resize Your Photo
First, you’ll have to decide what dimensions you want your print to be. 8” x 10” is a standard medium size for prints, so that’s what we’re going with here. Then, make sure your image is sized correctly for that print. As we mentioned before, a quick trick to ensure you get the highest quality print is to multiply the print dimensions (in inches) by 300. These numbers will equal the desired dimensions of your photo in pixels.
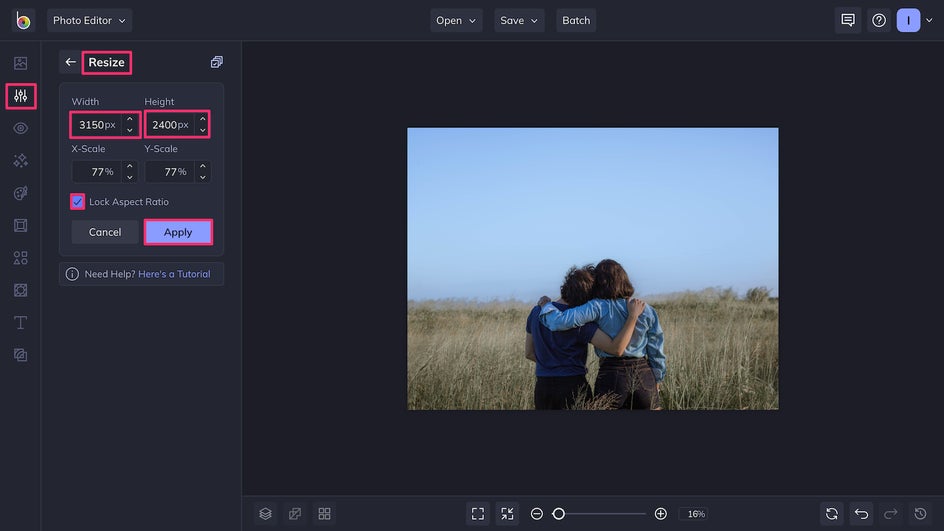
This means that to print our photo to measure 8” x 10”, our pixel dimensions should equal 2400px by 3000px. With these numbers determined, we can then resize the photo by navigating to Edit in the main menu, followed by Resize.
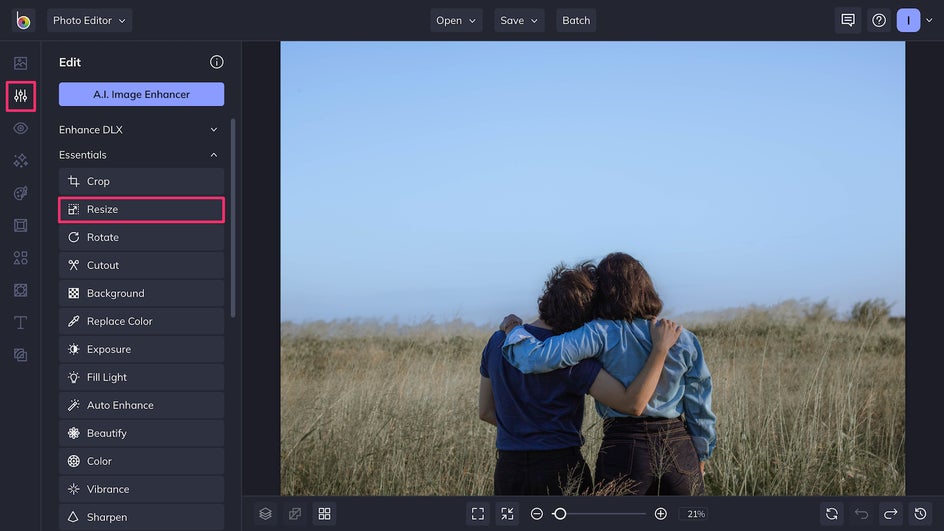
You’ll want to size the image for the smaller number of the two. In this case, we’re in landscape, so we want the height to be 2400px. To resize, simply type the Width or Height measurement into the relevant box, ensuring that Lock Aspect Ratio is checked. This prevents your photo from becoming warped or distorted during the process. Click Apply to finish resizing your photo.
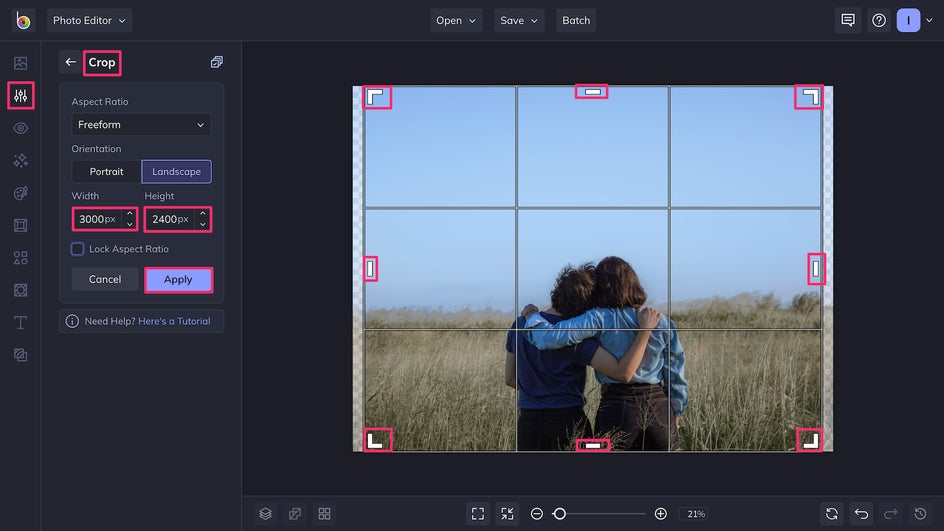
Step 2: Crop for the Proper Ratio
Our photo is not currently in the desired 8” x 10” ratio, so it will need to be cropped to achieve a proper resolution. We’re altering the height to fit this measurement using the Crop tool in the Edit menu. Make sure your subjects are right where you want them to be using the white tabs, then click Apply to confirm your changes.
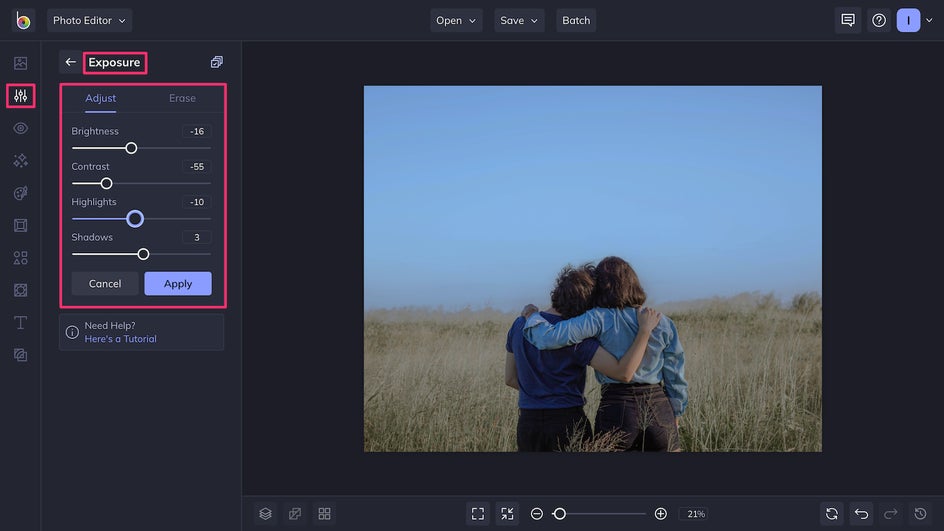
Step 3: Edit Your Photo to Perfection
Now that our photo has been precisely sized for our required printing dimensions, it’s time to edit it to make sure we get the right mood to match our space. We’ll be using the Exposure sliders to reduce the contrast and brightness of the photo. This results in a more mellow aesthetic, providing some calmness to a room. If you’re looking for something that pops, you can always increase both these sliders instead, or even adjust the Vibrance back in the Edit menu.
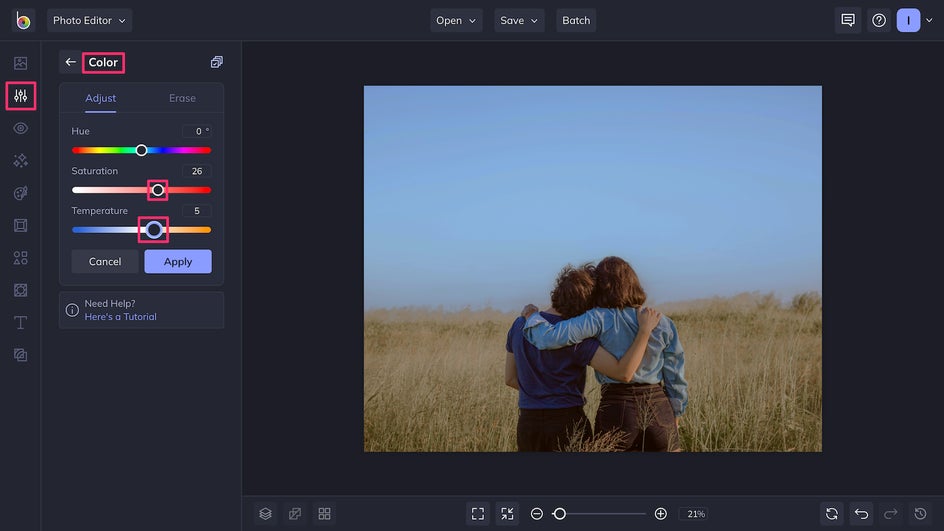
It can also be rewarding to play around with Color. Here, we increased the Saturation and warmed up the Temperature. The slight golden hue enhances the feeling that we’re capturing a moment in time.
There are dozens of other adjustments and effects available in the Photo Editor, so feel free to browse the settings and have fun. You can always undo steps or restart with the original copy of your photo.
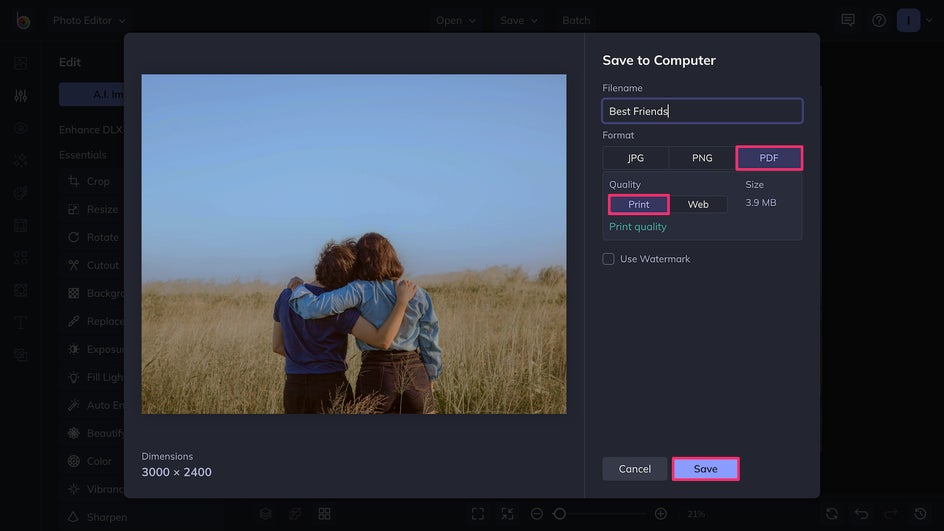
Step 4: Save Your Photo in Print Quality
Once you’ve finished adjusting and editing your photo to your liking, there’s one last step you’ll need to take - saving your photo. Navigate to Save at the top of the screen, followed by Computer, then PDF. Under Quality, select Print. This allows you to save your photo in the highest quality possible, making it perfect for printing.
Final Results
There was nothing wrong with our original photo, but it wasn’t quite print-ready. After resizing, cropping, and making a few minor adjustments, we ended up with an image that’s sure to look great in any frame and space.

Create Professional, High Quality Prints on Your Own
Now that you’ve learned how to prepare a photo for printing, there’s no need to worry about making a misaligned or low-quality print. You can fit your photos into any frame and make them look good in the process! Head on over to the Photo Editor to get started. In just a few clicks, you’ll have a polished, professional photo that’s ready to print.