Remove Noise and Clarify Concert Photos In a Single Click

If you’ve ever tried taking concert photos, only to find out that they look grainy and noisy when you import them, you are not alone. Taking photos in low lighting is extremely difficult because photography is literally the art of capturing light. When there isn’t enough light around for the camera to capture, you will only be able to take photos of the outlines of subjects, if that.

When taking photos at concerts, you are in a setting where the lighting is not in your favor. Because of the low light, you will need to adjust your camera settings to compensate for the lack of light and this can often cause photos to turn out grainy or “noisy,” especially if you are not using flash.
We are going to go over the technical reasons why your photos are grainy and then show you how you can use BeFunky’s Photo Editor to de-noise your images in the editing process using the Denoise tool.
What the AI Denoise Tool Can Do for Your Noisy Concert Images
The Denoise tool is the perfect tool for eliminating noise in your images. It works using A.I. to smooth out the pixels and problem areas in your photo, without blurring them. The Recover Faces option is also an incredible feature that can take the most blurry images and sharpen the details of the faces – which is perfect for the photos you’ve taken of your favorite artists. Trust me, this tool will do wonders for your concert photos.

There are other tools like Smoothing and Softening that will smooth the details of your image and fix many problem areas. You can find these tools and many others in the Detail Enhancements drop-down in the Edit menu.
Why Do Concert Photos Look Grainy?
Taking photos in low lighting makes your images look grainy. This is also referred to as “noise” in photography. No matter the term you use, this issue shows up as grainy or gritty texture in your images, speckled pixels of color, and other digital artifacts that create visual distortions.
Noise happens because of two things, low lighting and high ISO settings. In basic terms, in order to take photos in low light, you need a slow shutter speed to let in more light. When you do this in a low light setting, the camera is trying to pick up on any speck of light particles it can – and that is basically what you are seeing, the light particulates being captured against a dark background. To compensate for these dark settings, you typically have to use a higher ISO, and whenever you increase ISO, your photos will also look grainy.


In order to prevent this, you will want to take the photo with the highest shutter speed you can for the setting and then adjust your aperture and ISO to let light in.
Avoiding Noisy Concert Photos on Your Mobile Device
If you are taking photos on a mobile device, you can decrease your exposure while taking the image in order to get the clearest image in both sharpness and brightness. Decreasing exposure on a mobile camera acts in the same way as if you increased the shutter speed on your DSLR camera. When you do this, it will make your images darker and sharper, with less opportunity for blurring – but if you adjust the settings to get clearer images, you will need to adjust the other settings in order to let in enough light to capture your shot.
How to Denoise Your Concert Photos
Start by uploading your photo into the Photo Editor. Next, select the Edit tab in the lefthand menu. Click the Smoothing dropdown menu. Once here, select the Denoise tool. Or, head straight to the tool by clicking here.
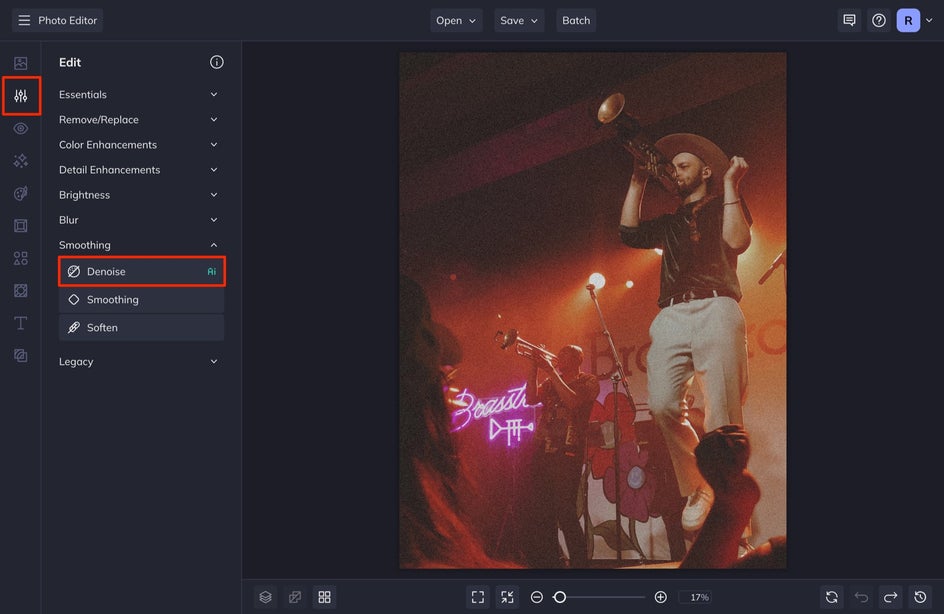
All it takes is one click of the Denoise tool to reduce or remove the noise in your image and smooth it out, all without taking away from the sharpness of the image.
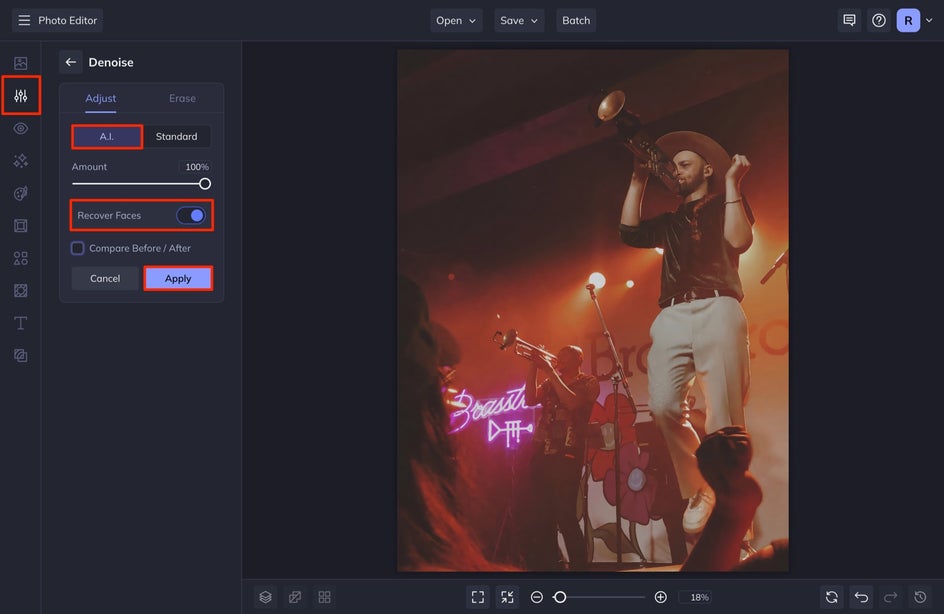
I like to have the A.I. tab selected so that I can depend on the power of A.I. to do what it does best. This tab will make it so that your photos look very clear and smoothed out. A really amazing option in the A.I. tag is the Recover Faces toggle. When this is turned on, it will enhance the faces of the individuals in your photo, preserving their natural features. This is an amazing tool for bringing out the detail in old images, especially when you want to remember the concert of your life and your favorite artists!
A.I. will almost always remove the noise in your image, whereas the Standard tab will simply reduce the noise, but leave some texture to the photo. You can have more control over your editing process with the Standard selection by individually adjusting the Amount, Smoothness, and Fine Details.
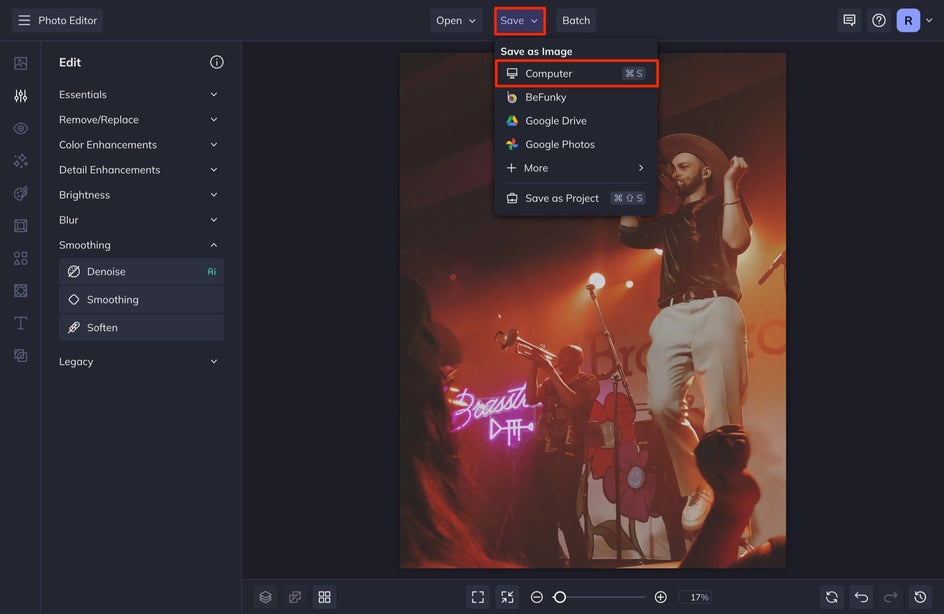
When you are finished editing, select the Apply button. You can also save your image by selecting the Save button and choosing your desired save location.
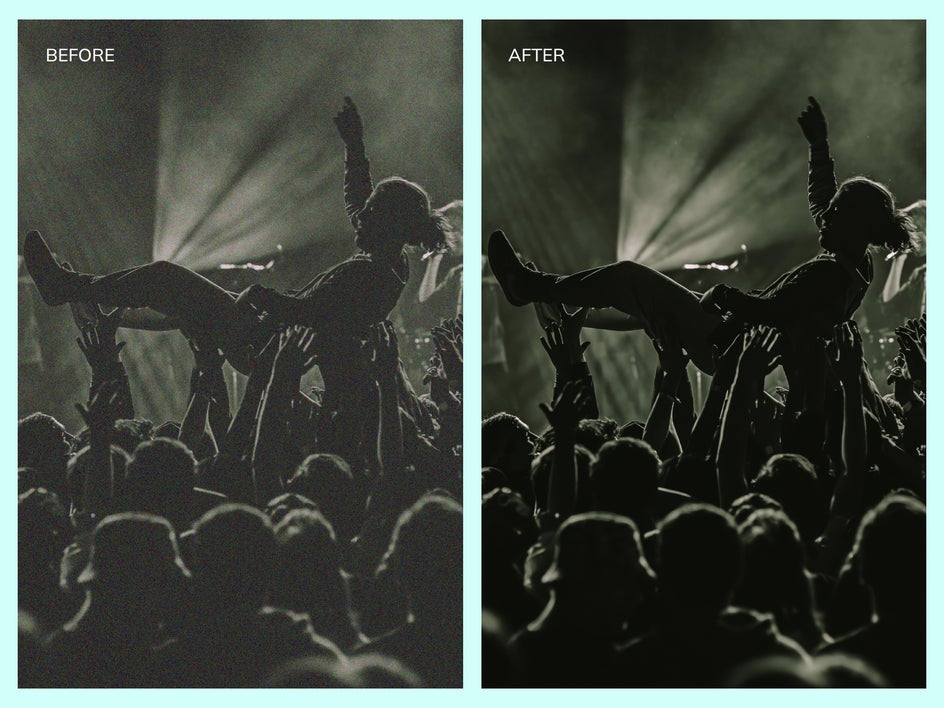
Here is what the Denoise tool can do to a dimly lit concert photo with a lot of noise in it.

Quickly Remove Noise From Photos Using the Denoise Tool
With the Denoise tool, you no longer have to worry about bumping up your ISO settings to get the shot. When you rely on these powerful A.I. tools in BeFunky’s Photo Editor, your photos can be transformed from noisy to smooth and clear in a single click.