Color Grade Images With the Color Mixer

Color grading is the process of adjusting colors and tones in an image, whether to correct color imbalances or adjust them to create a specific mood or style.
Color grading can easily change the aesthetic of your imagery, alter the temperature of your photo, and even enhance the effect of the story you are trying to tell. While the Color Grading tool in BeFunky’s Photo Editor is a powerful and simple solution to color grading, there is a tool that provides more control when color grading your images: the Color Mixer Tool.
We’re going to teach you everything you need to know about this revolutionary tool. We’ll even show you our 4 simple steps to achieving picture-perfect color grading using the Color Mixer!
The Science of RGB Color Theory
It is important to know that all images are comprised of Red, Green, and Blue. Red, Green, and Blue colors formed by light, mix together in different ways in order to produce all other visible colors. Don’t forget that cameras are simply a tool used to capture light. When color mixing an image, you are essentially manipulating the amount of Red, Green, and Blue that shows up in both the Highlights, Midtones, and Shadows. This is going to help you out when using the Color Mixer Tool.
How to Edit an Image With the Color Mixer Tool
Ready to correct colors or create a different mood in your own photo using the Color Mixer tool? Head to the Photo Editor and open your image to begin.
Step 1: Navigate to the Color Mixer Tool
You’ll find this tool in the Edit menu, under the Color Enhancements section.

Step 2: Adjust the Balance Section
Firstly, we’re going to start making adjustments within the Balance section of the Color Mixer. Choose the tone range that you would like to edit:
- Shadows: The darker areas within the image.
- Midtones: The range of tones that lie between the deepest shadows and the brightest highlights.
- Highlights: The lightest, most radiant parts of the image.
Midtones cover the broadest range of tones, so we recommend starting with this tone range. You can then fine-tune the Shadows and Highlights, if necessary.
Move the color adjustment sliders left or right (or input numbers) to shift the selected color(s) within the tonal range.
The Preserve Luminosity option is enabled by default. Uncheck the box to deselect this feature for a more matte effect.

Step 3: Customize the Adjust Section
The Balance and Adjust sections work together to impact the overall result of your image, so next we’re going to make some tweaks to the Adjust settings.
Click Adjust (located next to Balance), then select the desired color spectrum swatch you want to edit. You can choose from a range of warm and cool tones to make isolated edits.
You can adjust these color spectrums by moving the sliders left or right or inputting your desired amount as a number. There are four sliders, each impacting your image’s color in different areas:
- Hue: This represents the primary color family. Moving the slider adjusts the chosen color spectrum swatch to the specified Hue.
- Saturation: This controls the intensity or vividness of the color.
- Luminance: This influences the perceived brightness of a color.
- Contrast: This alters the level of difference between the lightest and darkest tones of the color.

Did you know that you can also add these color grading effects to only selected parts of your image? To do this, click on the Select tab, located next to Adjust. Use the sliders to customize the effect area, then paint it onto selected parts of your image using your cursor.
Once you’ve finished using the color corrector, click Apply.

Step 4: Save Your Color-Graded Image
Finally, all that’s left to do is to click Save at the top of the screen, then select your desired save location.

Final Results: Color Grading With Complete Control
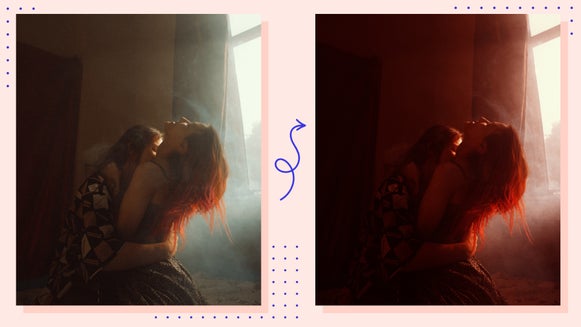
All it took was a few minutes to transform this cool tone, washed-out image into one featuring warm tones and a more realistic color palette.


Inspiration: Ways to Get Creative With the Color Mixer
Ready to unleash the full creative power of the Color Mixer? Here are just some of our other favorite ways to use this tool to totally transform your images!
Futuristic Tones
Experiment with colder, metallic shades like icy blues to give your photos a futuristic, sci-fi vibe. By adjusting the color mixer, you can give everyday scenes a high-tech and otherworldly feel that’s perfect for creative portrait projects, street photography, or cityscapes.


Retro Color Palette
Experiment with muted color palettes, like pastel pinks and faded greens, for a classic vintage look. We also recommend lowering the Saturation and tweaking the Hue to create a faded and old-school aesthetic reminiscent of film photography from the ’60s and ’70s.


Customize Nature Shots
For landscape and nature photography, use the Color Mixer to enhance or alter natural colors. For example, you could make the sky more vibrant, transform green foliage into shades of purple, or even give your landscapes a surreal twist by introducing a fantastical color palette such as purple grass – as we’ve done in this example below.


Want an All-In-One Color Grading Tool?
The Color Mixer Tool is a great way to get more color grading control than ever before. Use it to correct the color in your photo, alter its tone, or even add an entirely new mood. Try the Color Mixer for yourself to see just how amazing it really is!