Multiple Ways to Instantly Enhance Your Photos With BeFunky

You don’t need to be a professional photographer to make your photos look polished and vibrant. With BeFunky’s Photo Editor, enhancing your images can take just a few clicks. Whether you want to improve lighting, sharpen details, realistically enhance portraits, or revive older photos, there are several powerful tools designed to do the hard work for you.
The best part? Many of these tools use smart technology to analyze your photo and apply the right adjustments automatically. That means you can achieve beautifully enhanced results without spending time manually tweaking sliders or learning complex editing techniques.
In this guide, we’ll walk through a few of the easiest ways to instantly enhance your images within our Photo Editor. From AI-powered portrait improvements to one-click auto adjustments, you’ll discover just how simple it is to transform your photos in seconds!
Instantly Enhance Your Photos With These 4 Tools
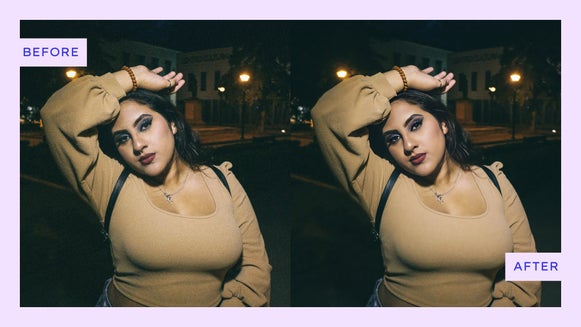
Portrait Enhancer for Flawless Portraits
If your photo features a person, the Portrait Enhancer is one of the quickest ways to refine and polish your image. This AI-powered tool automatically detects faces and enhances skin tones, lighting, and overall clarity for a natural, flattering result.

You can find the Portrait Enhancer in the Touch Up tab. Once you click on the tool, it’ll instantly analyze your portrait then adjust it accordingly. You can then control the strength of the changes by using the corresponding slider.

Portrait Enhancer works especially well for selfies, professional headshots, family photos, and social media profile photos. Instead of manually adjusting exposure, smoothing skin, or correcting colors, the tool intelligently applies subtle improvements that help your subject look their best while still keeping the photo realistic.


Image Enhancer for Overall Photo Improvements
When you want to improve an entire photo at once, Image Enhancer is a great place to start. You can find it within the Edit tab, located underneath Essentials.

This tool uses AI technology to analyze your image and automatically enhance details like lighting, color balance, contrast, and sharpness.

It’s perfect for everyday photos that look a little flat or dull straight out of the camera. With just a click, Image Enhancer can brighten shadows, boost colors, and bring out details that make your image feel more vibrant and polished.


Auto Enhance for Quick Adjustments
Auto Enhance is another simple way to improve your photos in seconds. Like many of our instant photo enhancing tools, it can be found within the Edit tab, underneath Brightness.

While similar to Image Enhancer, Auto Enhance works a bit differently. Instead of relying on AI analysis, it automatically adjusts key settings like brightness, contrast, and color balance to create a more balanced image.

It also includes a Color slider, allowing you to control how saturated or subtle the color enhancements appear. This makes Auto Enhance a great option for when you want a quick improvement while still keeping some control over the final look.


Denoise for Cleaner, Smoother Images
Sometimes a photo doesn’t just need color or lighting adjustments; it needs a little cleanup. This is where the Denoise tool comes in. Located in the Smoothing section of the Edit tab, this tool is designed to reduce digital “noise” or grain, which often appears in low-light photos or images taken with older cameras.

With just a few adjustments, Denoise smooths out excessive and unsightly grain while preserving important details, helping your image look clearer and more refined.

It’s especially useful for maintaining that dreamy, soft-focus aesthetic often associated with film photography – without the distraction of harsh digital noise. It’s an easy way to give your photos a polished finish while still keeping their original mood and character intact.


Enhance Your Photos in Just a Few Clicks
Enhancing your photos doesn’t have to involve complicated editing tools or hours of manual adjustments. With features like Portrait Enhancer, Image Enhancer, Auto Enhance, and Denoise, our Photo Editor makes it easy to improve your images in seconds.
Whether you’re polishing portraits, refining poorer quality photos, or simply brightening everyday snapshots, these tools help you achieve professional-looking results with minimal effort.Ready to try it for yourself? Visit the Photo Editor and start enhancing your images in just a few clicks!